

Like with all Ontologize tutorials, all data shown in this tutorial, which may include including names and emails is notional data generated solely for teaching purposes.
Before you begin...
This article assumes familiarity with Foundry ontology objects and the links between them. As a refresher, object properties refer to the attributes of an object. For example, if we had a “dog” object, breed, height, weight, color, and age would be properties. This is akin to how you have multiple columns for a single row of data.
Why does Foundry have Actions? What are they?
When you create object types and their links in Foundry, you won’t be able to modify or create new objects automatically. Foundry has Actions so that users can create, modify and delete objects. In the example in this article, we will be building and using Actions in a passenger railroad issue management workflow.
Let’s say that we have a train company, and we need to keep track of train issues. Train issues may come from many sources – reports from riders, mechanics’ work orders, or maybe even via automated processes. Regardless, there may need to be a human who can manually add new issues and modify existing ones. By using Actions, organizations can enable users to make manual edits where it is necessary to do so.
What do Actions allow users to do and what problems do they solve?
Let’s get more specific. In this case, riders will call the train company to report issues, and an operator on the other end will record details about the issue in Foundry. Moreover, they’ll want to update existing issues. For example, an operator may want to change the priority of an issue, or assign it to another individual who is better equipped to handle it.
Actions address all these needs. They let users create, edit, and delete objects. They also provide a user-friendly form interface that can be used in Workshop applications, Quiver, wherever else Actions are used in Foundry.
Who uses Actions?
Many Foundry users will use Actions, but how they engage with Actions depends on their role:
- Workflow builders will configure them for other people to use.
- Operational users will use the built Actions to carry out their jobs – but all they’ll see is the front-end, which is a form.
- Developers may interact with Actions via API calls.
How do you build an Action?
What kind of Actions do we have?
First, there are several classes of Actions – Actions on objects, actions on links, function-backed Actions, and Actions that call webhooks. In this post, I’ll be focusing on Actions on objects.
Within Actions on objects, there are three different operations you can perform:
- Add – Add a new object to an existing object set. In our example, that would be adding a new issue to the issues object set.
- Note: The object set must already exist. You cannot create a new object set by an Action.
- Modify – Modify properties of an existing object. You can modify all properties of an object except for its primary key. In our example, that could mean changing the priority of an issue or re-assigning it to a different team.
- Delete – Delete an existing object.
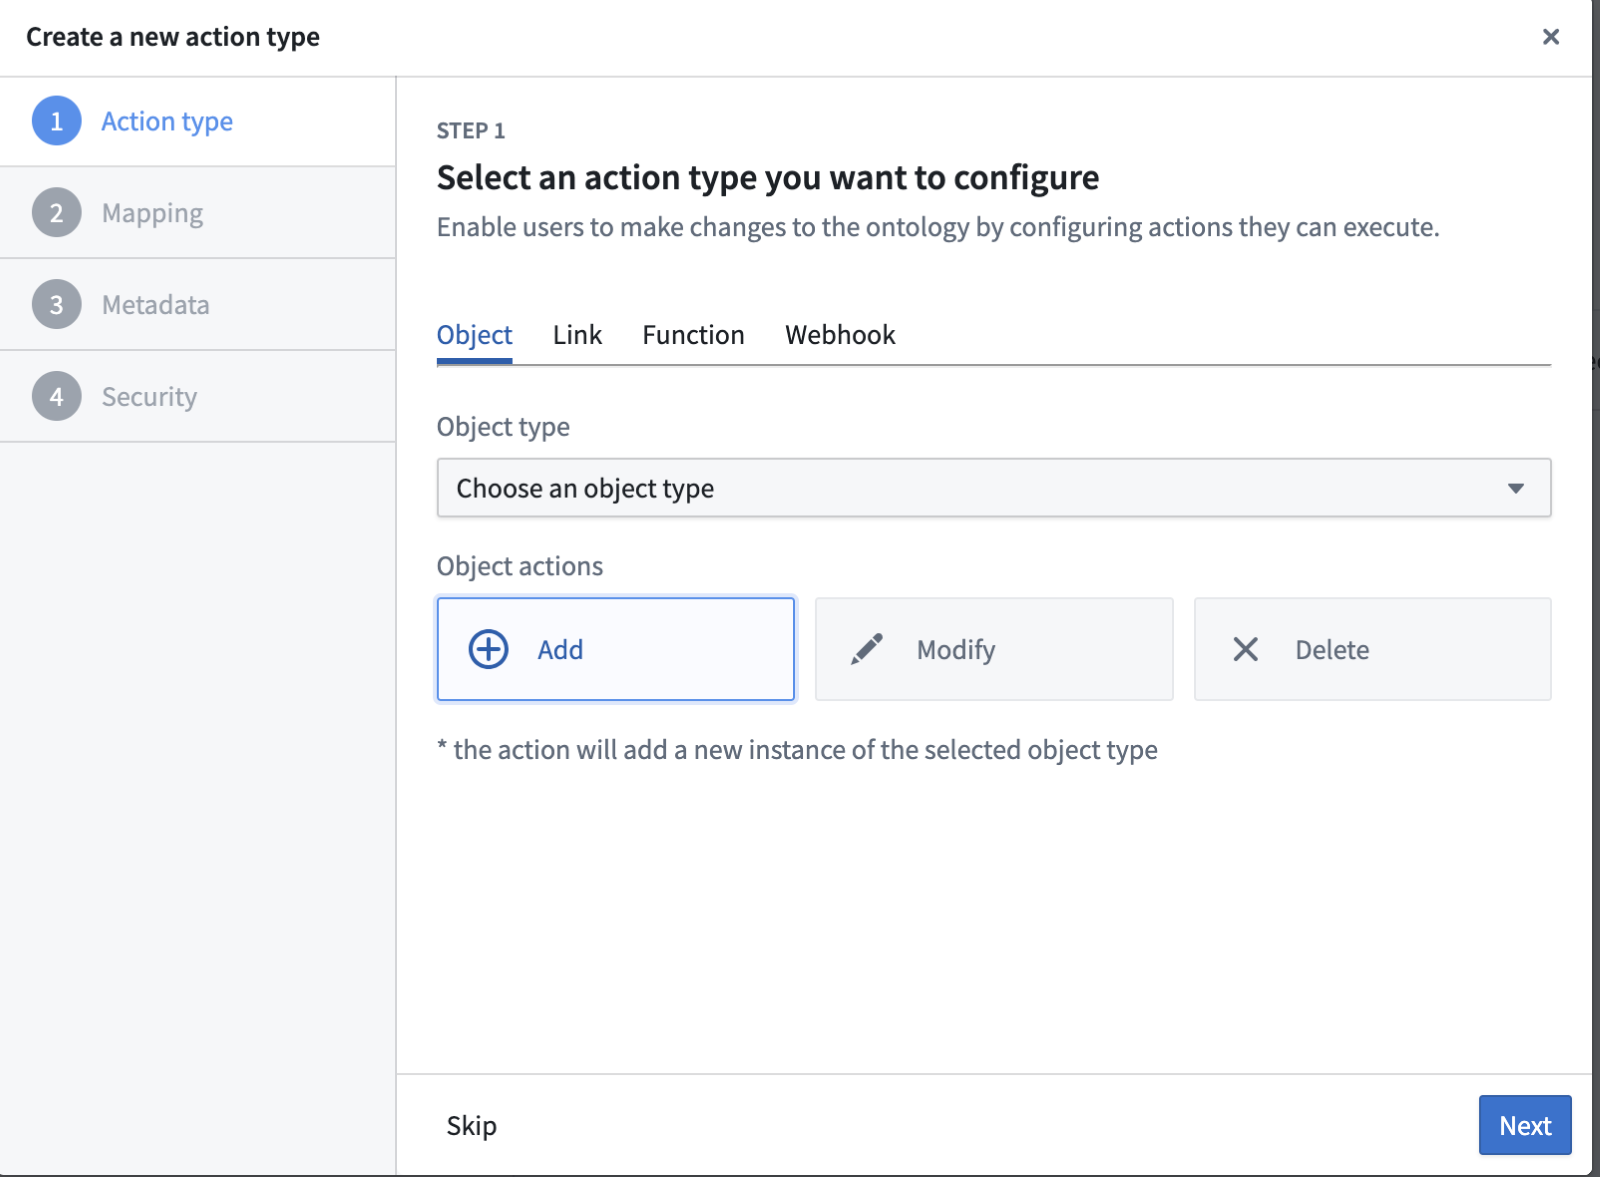
Setting up your Action
Before you select which type of Action you’d like to build, you’ll need to select which object set you’d like to be able to take the Action on. You’ll see here that I’ve searched for my “Train Issues” object that I created, but I can’t select it.
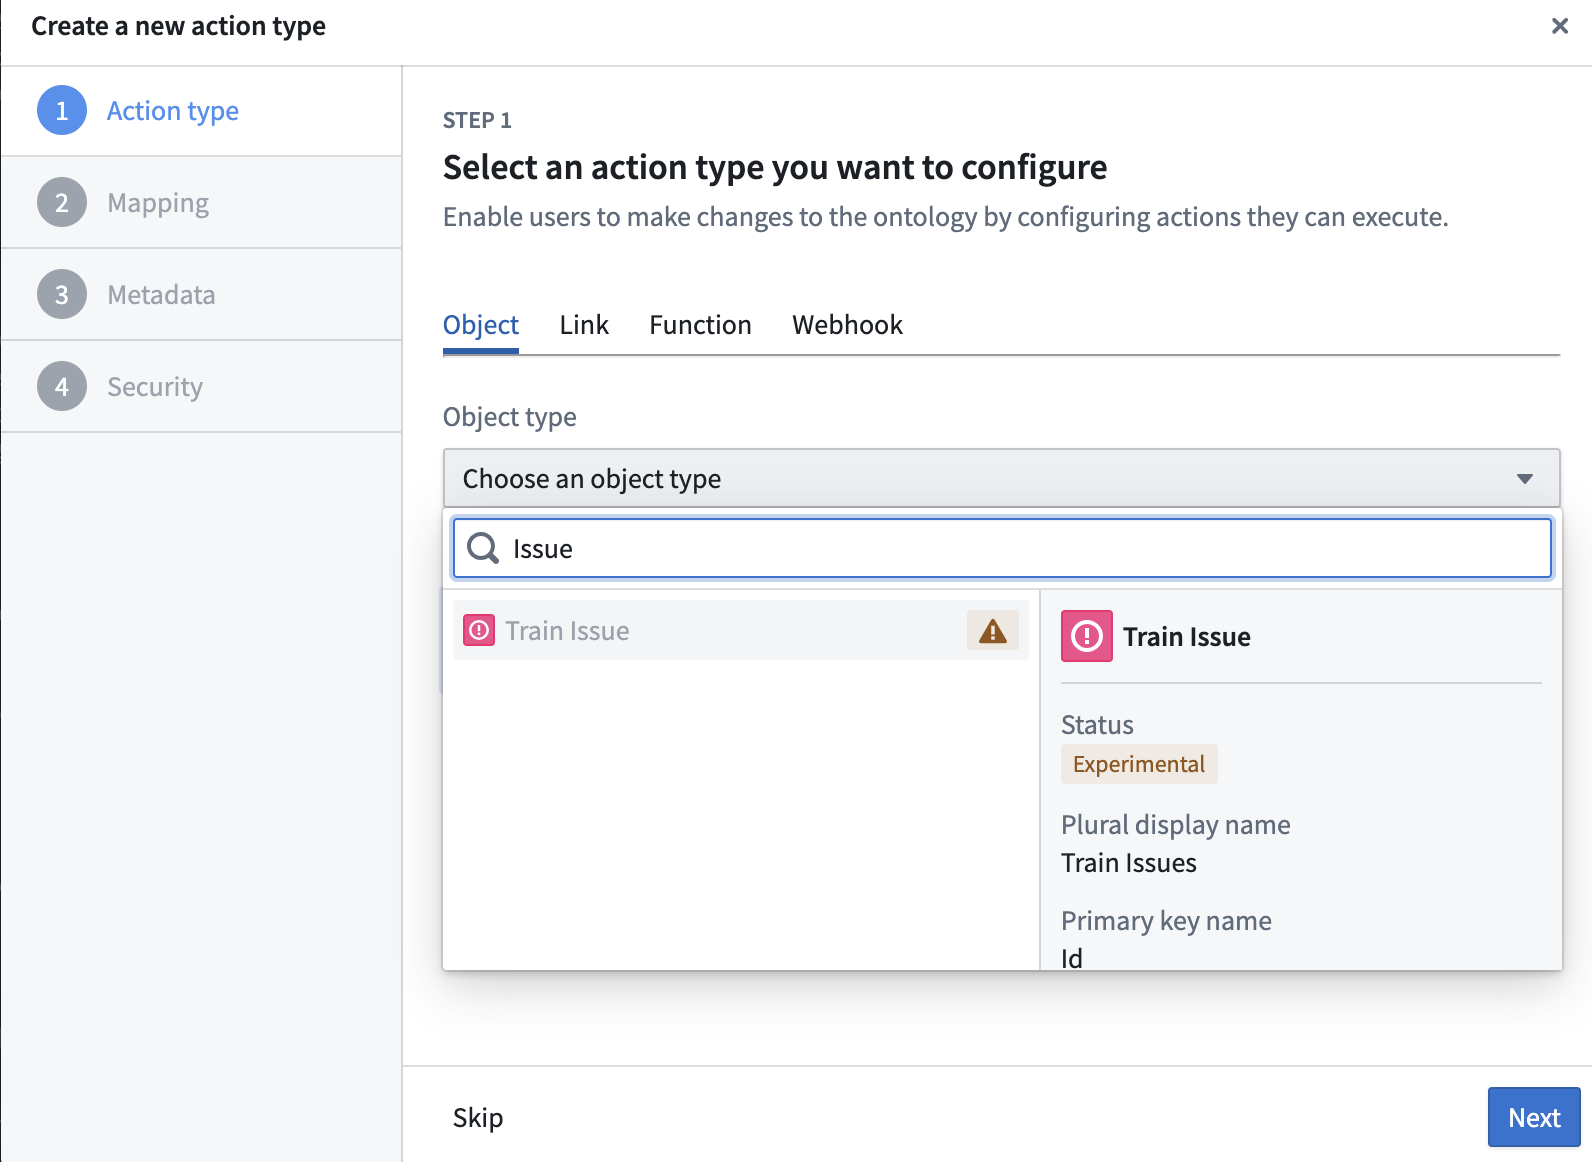
That’s because before you create an Action on an object, you must enable edits on the object type. Note that creation and deletion of new objects is considered an edit to an object set. You can do this by navigating to the object type in the Ontology Management Application, selecting the “Datasources” tab, and toggling to enable edits. Remember to save the change after you complete this step.
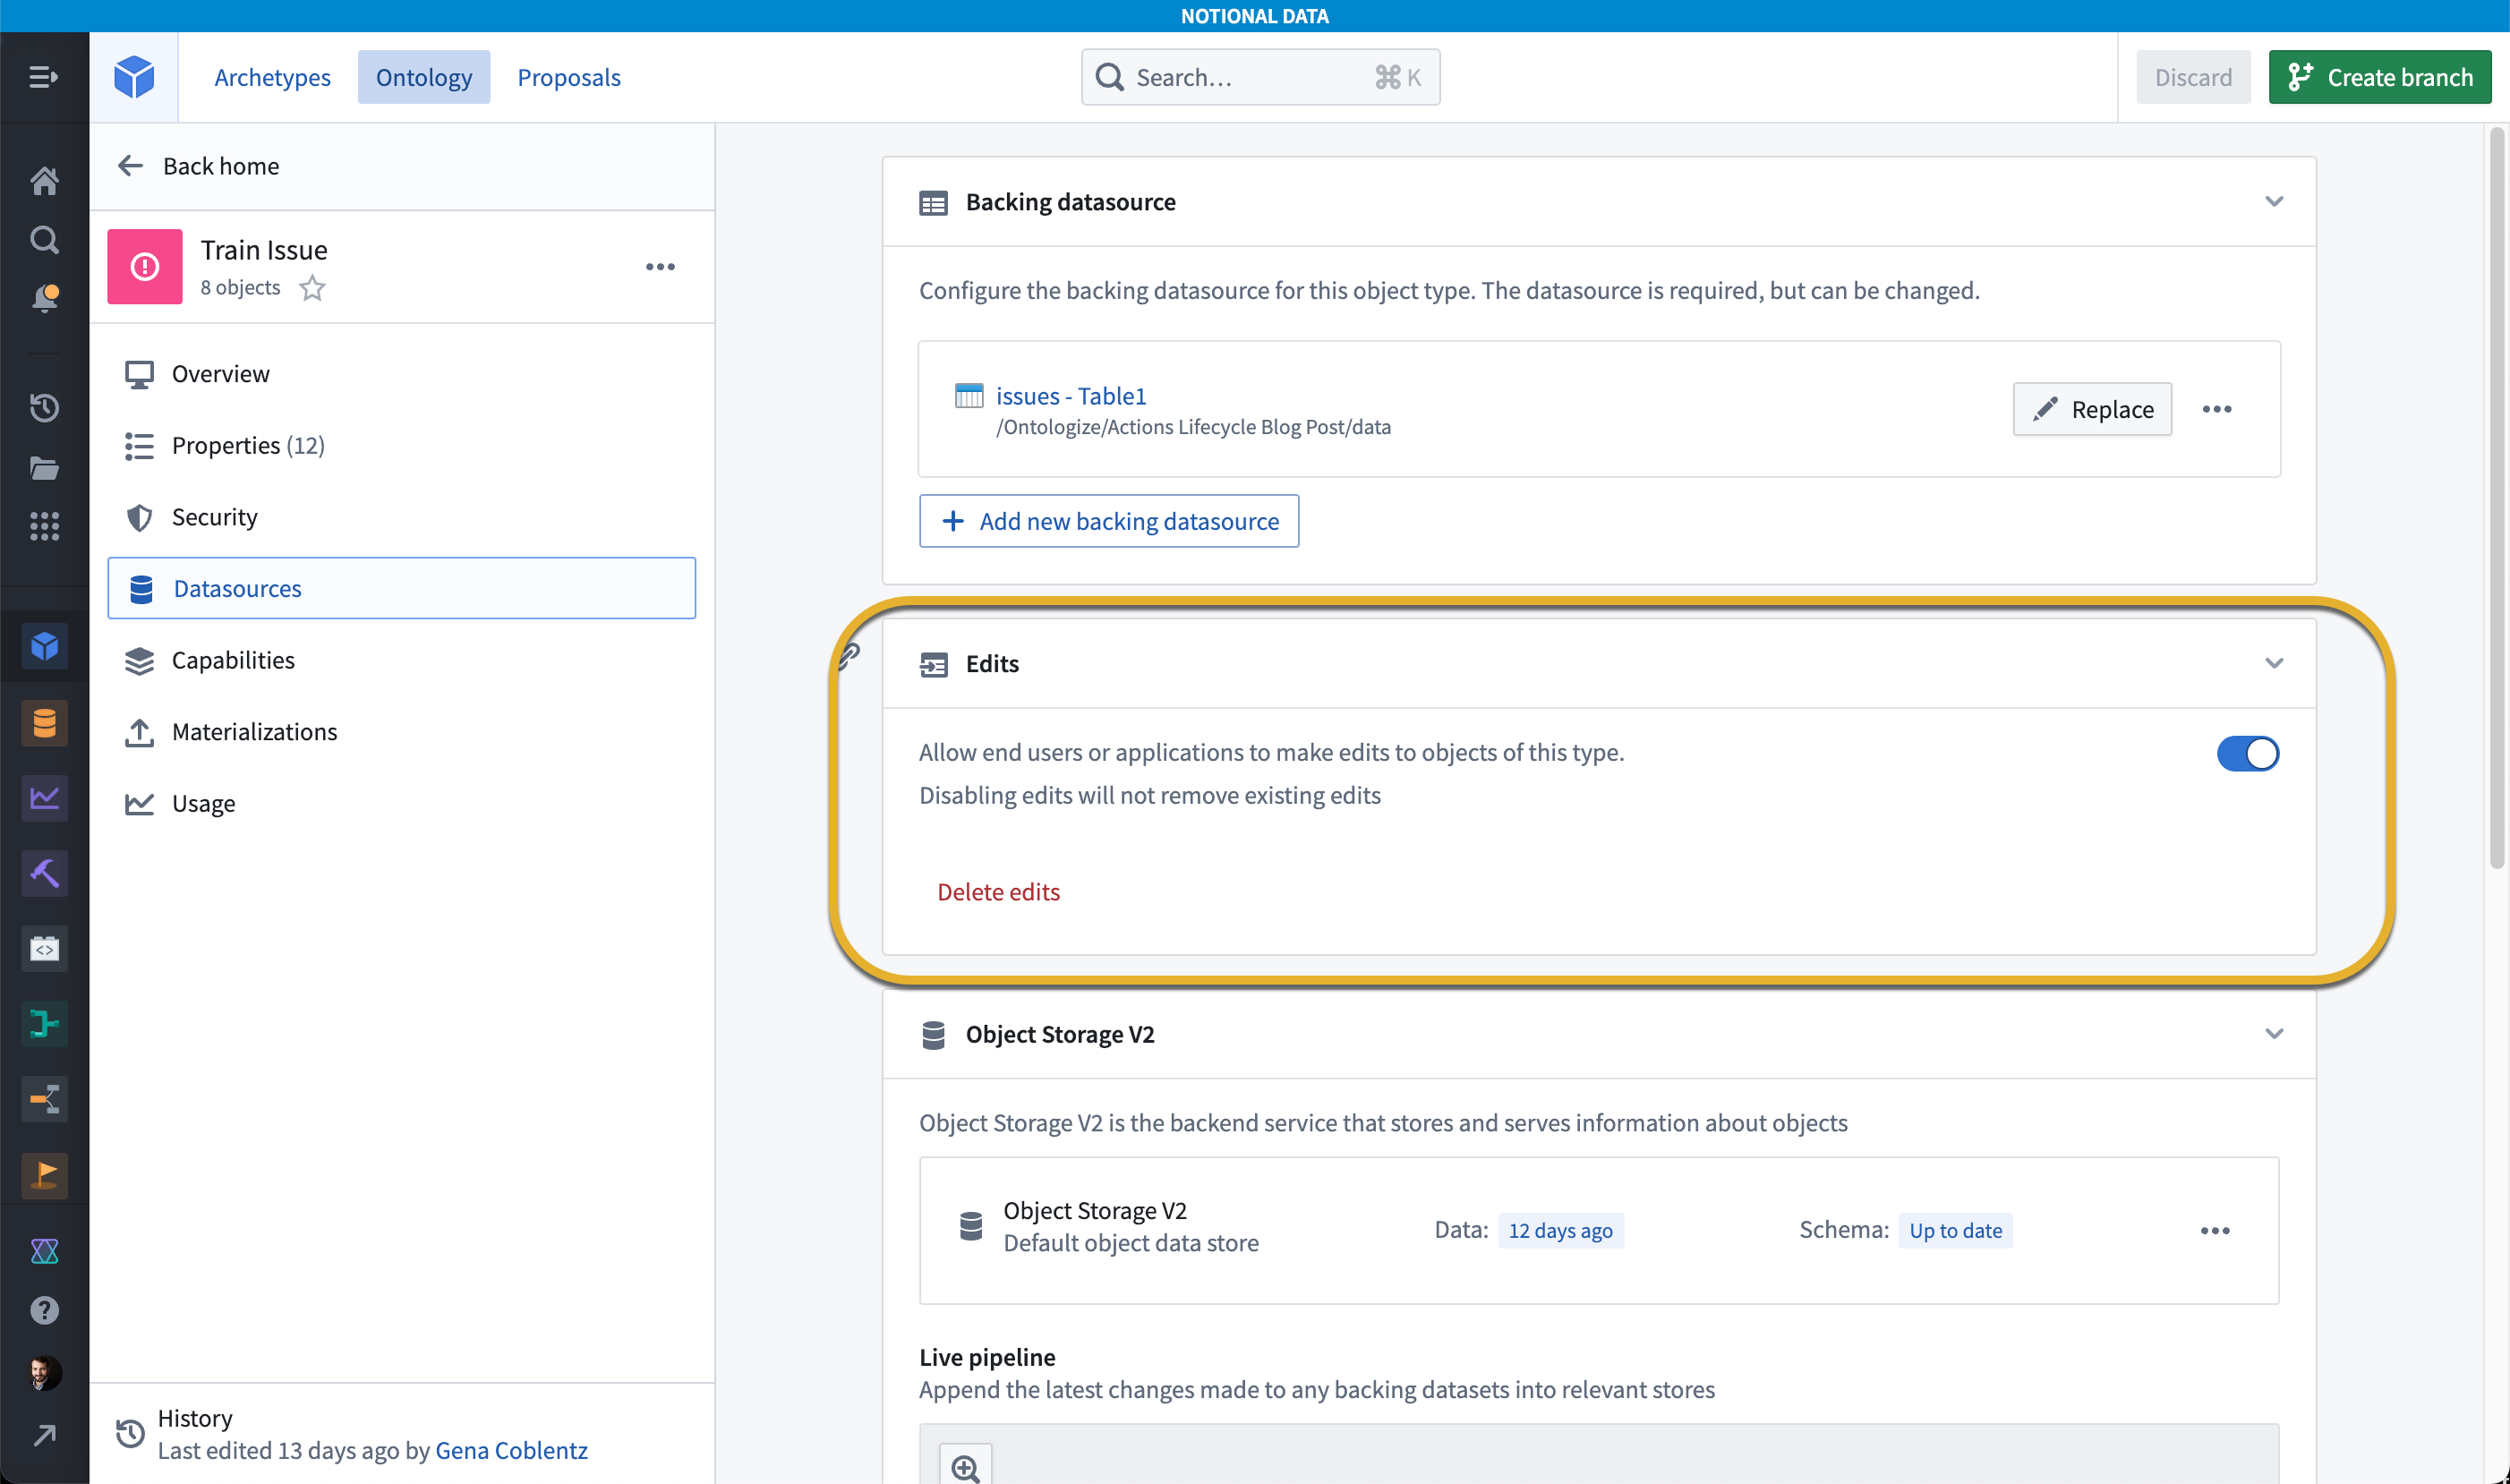
Now that I’ve enabled edits, I'll be able to select the object I want to make an Action for. We’ll start with creating an “Add” Action. Again, this is the Action that will create a new train issue in our system.
Set-up
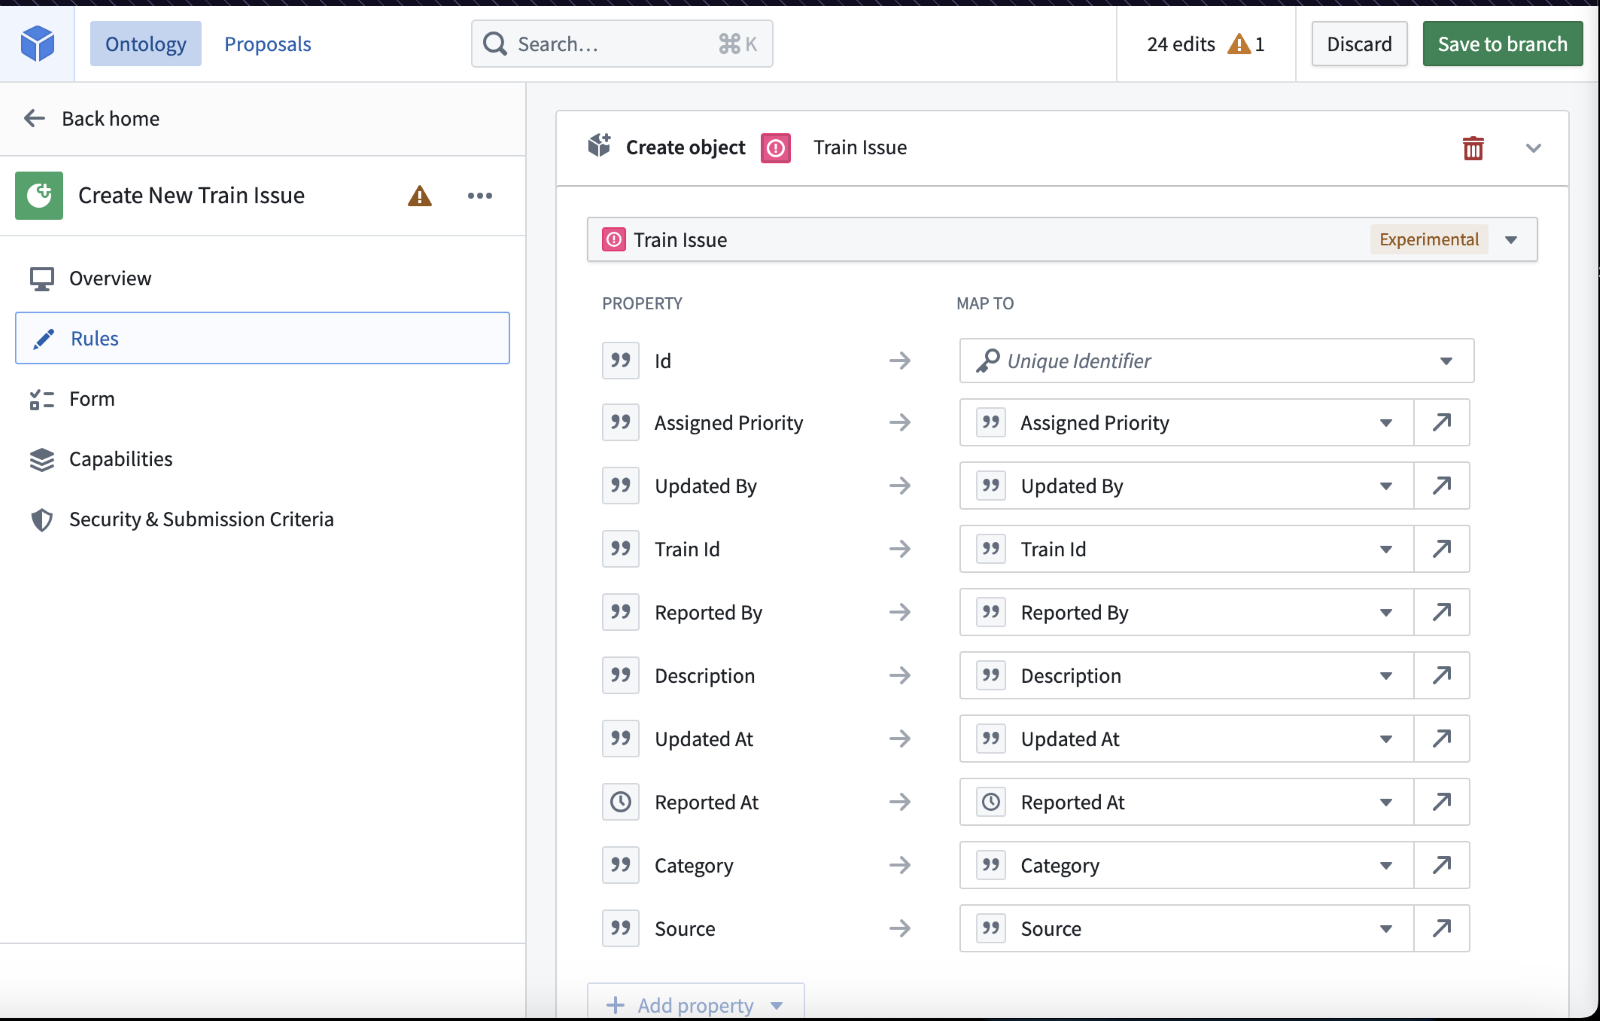
Something to keep in mind: if the operator is going to make new objects or modify existing ones, they’ll need a form with fields to fill out. First, you’ll need to select the object properties that you’d like to populate when a user executes this Action. When you’re making a new object, you must specify a value for the primary key property, which I’ve circled (and it must be unique from any of the other objects), but the rest of the parameters do not necessarily need to be mapped. If you don’t give a property a mapping, it will simply be null in the resulting object, which may be just fine depending on the use-case.
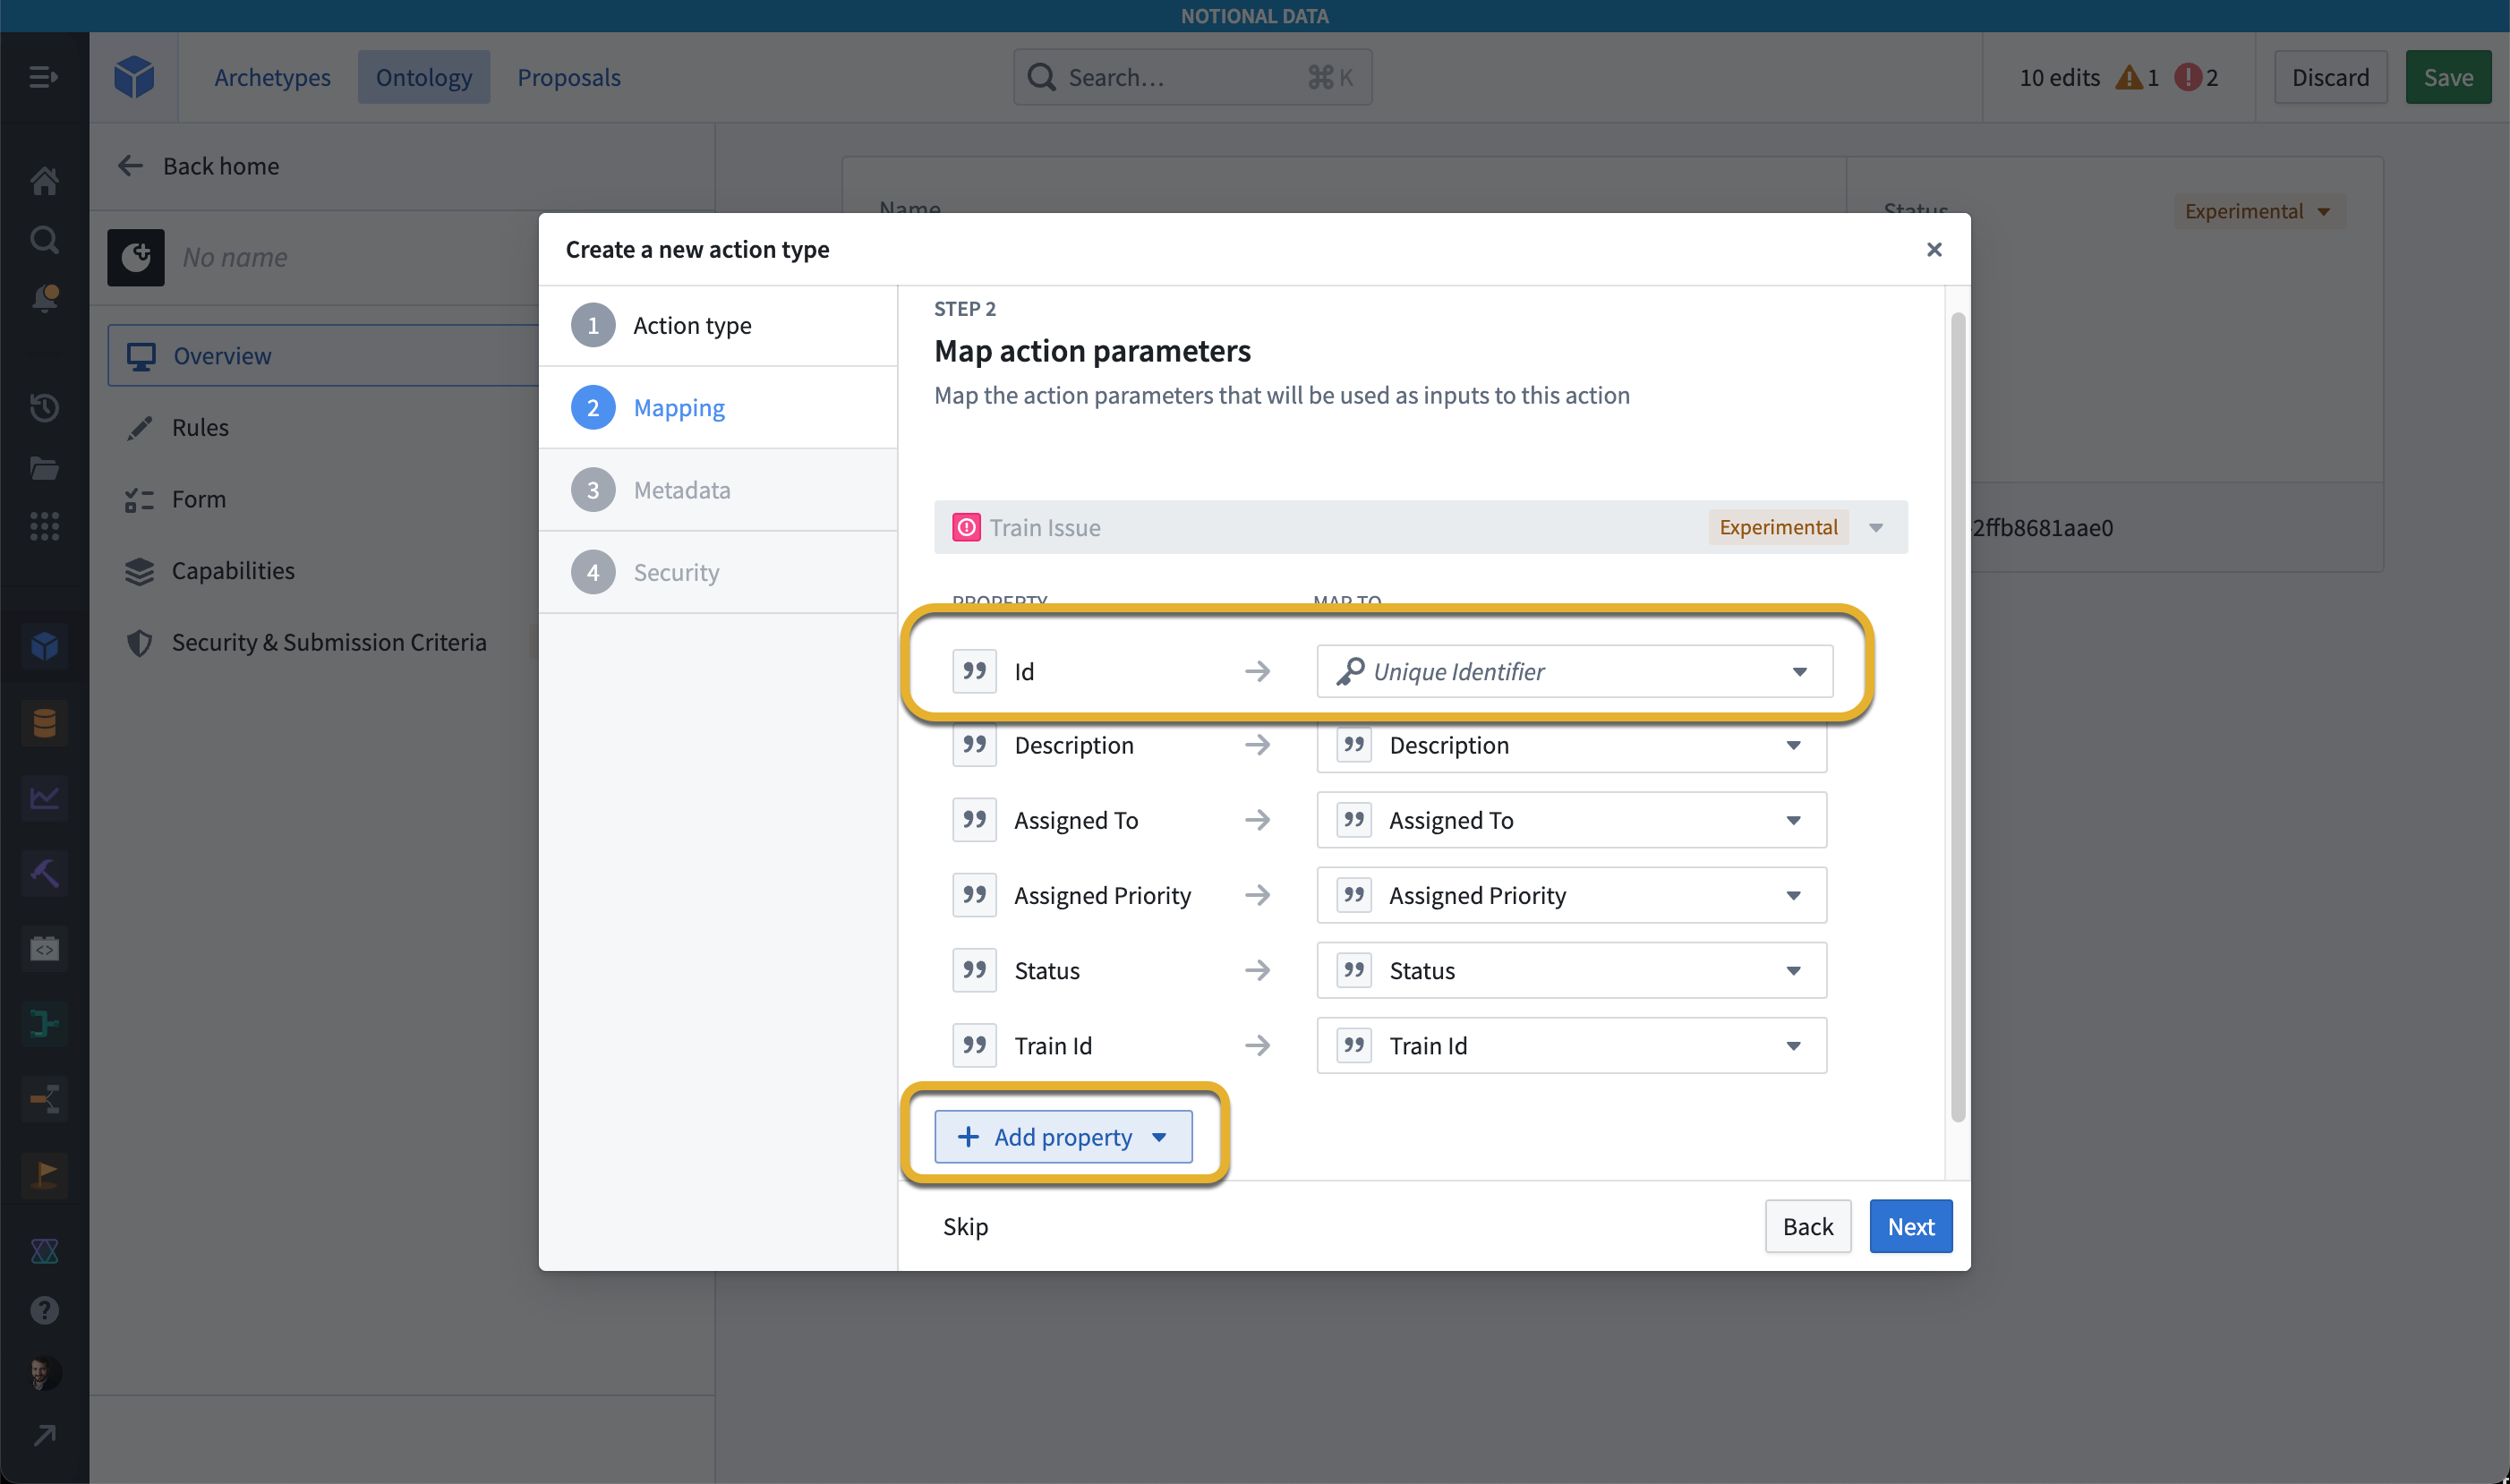
In this case, I am mapping all of the properties. You can continue to add properties to map using the “Add property” button.
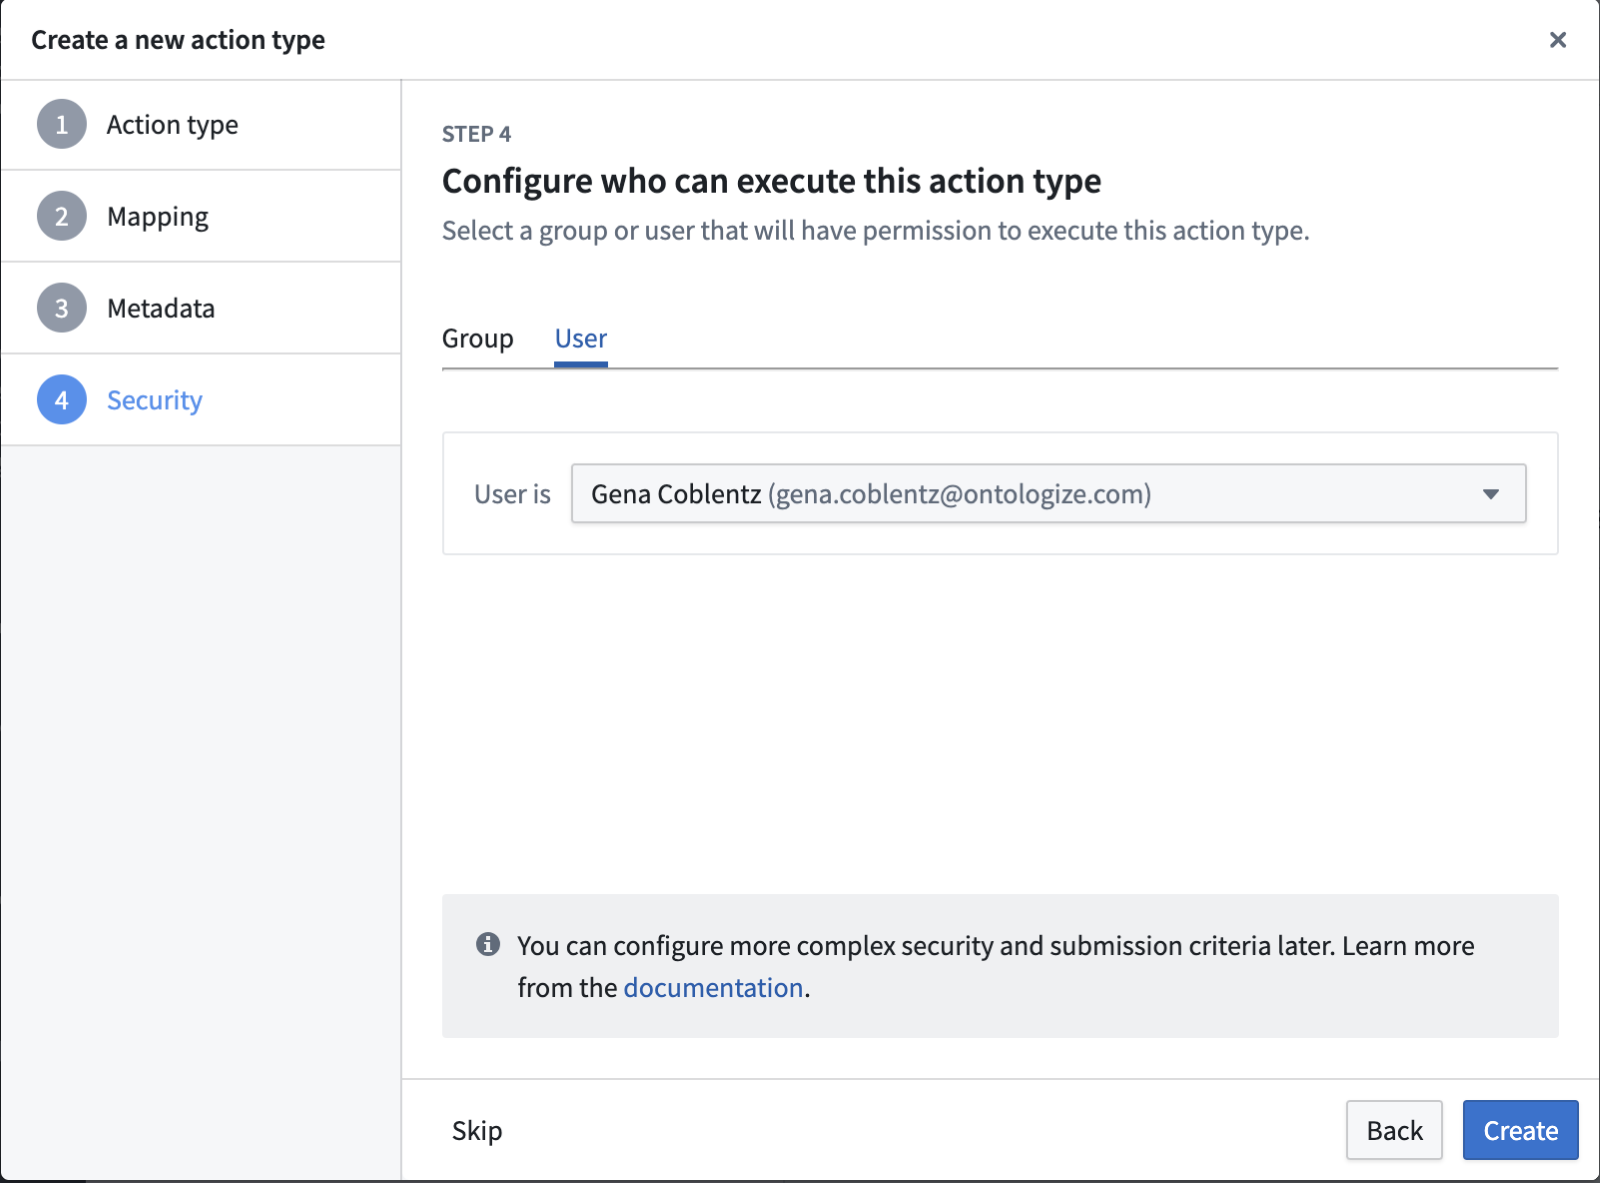
Next, you’ll need to configure who can execute this action. Note that these permissions are specific to the Action itself – a user must have access to the application where this form is being surfaced. In this case, I’ve selected myself. You can also select a group. Later in the setup process, you can configure more complex security and submission criteria. Note: don’t forget to update this! It’s easy to set it to yourself by default and forget to change it, and then your users won’t be able to use the Action.
Now, we can do a more detailed configuration for how each property gets filled in. Some of these fields should be editable, but others should not. For the latter, it’s your job (as the creator of the Action) to specify what the value for the field should be.
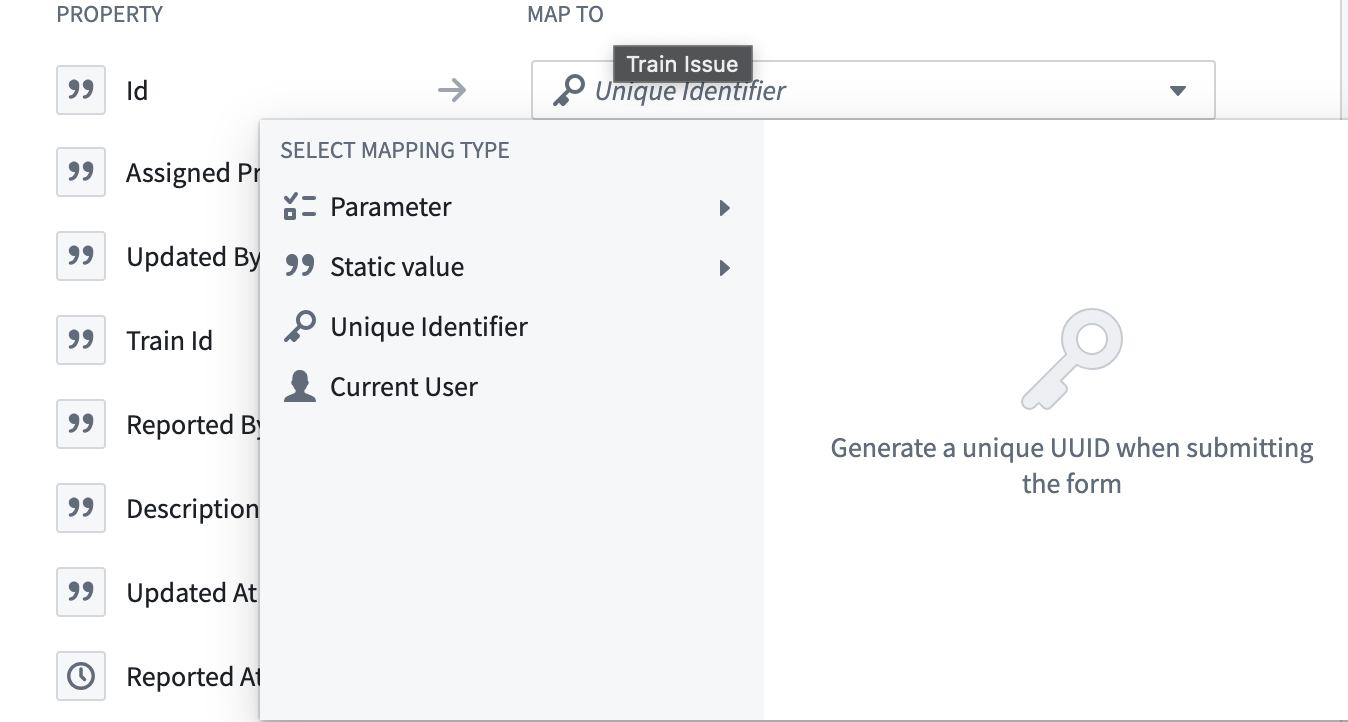
When you click the dropdown next to each property, you’ll see that there are several ways to populate the property. For strings, you can map to a field in the form (in the configuration, this is called a parameter – that's what will happen by default), a static value, a random unique identifier, or the current user. In this example, we don’t want the user filling out the primary key field, because they might not enter a unique value. For the primary key, I recommend using the generated unique identifier. Similarly, our users shouldn’t need to write their name or the time at which they are submitting the form, because that’s information that we can easily collect. For the “Reported By” and “Updated By” fields, we’ll make use of the “Current user” option.
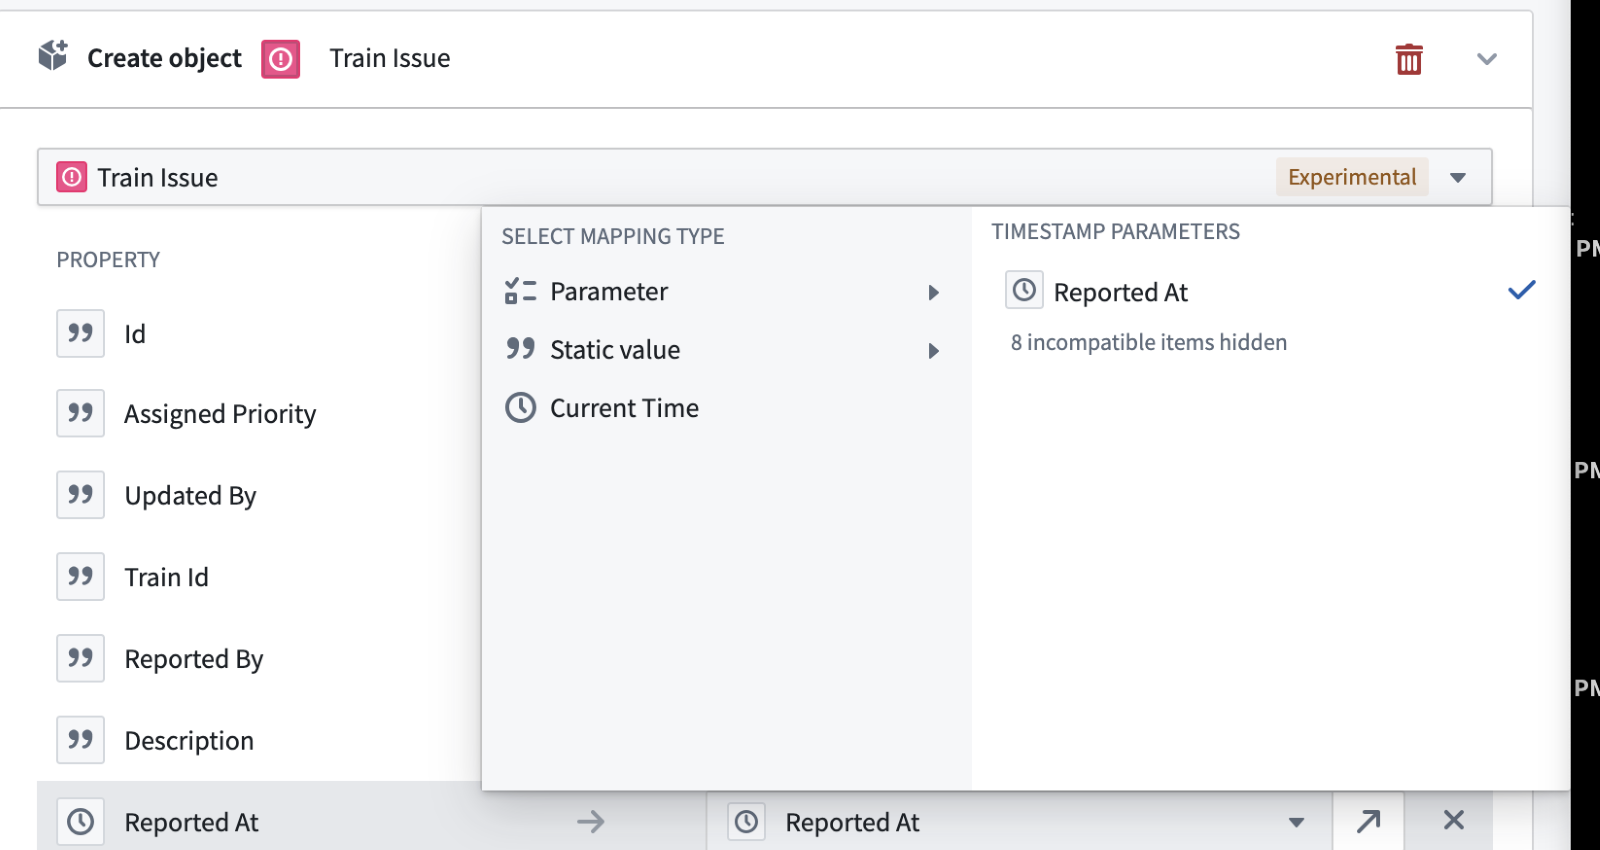
For timestamps, you have the option to input the current time in addition to populating with a parameter or a static value. We’ll select the “Current Time” option.
Building the Form
Once you’ve configured what your Action does, you can configure how the user does it via the form. The form is the next tab after rules. As you configure the form, you can see a form preview on the side. This is how it will look when you incorporate it into an application.
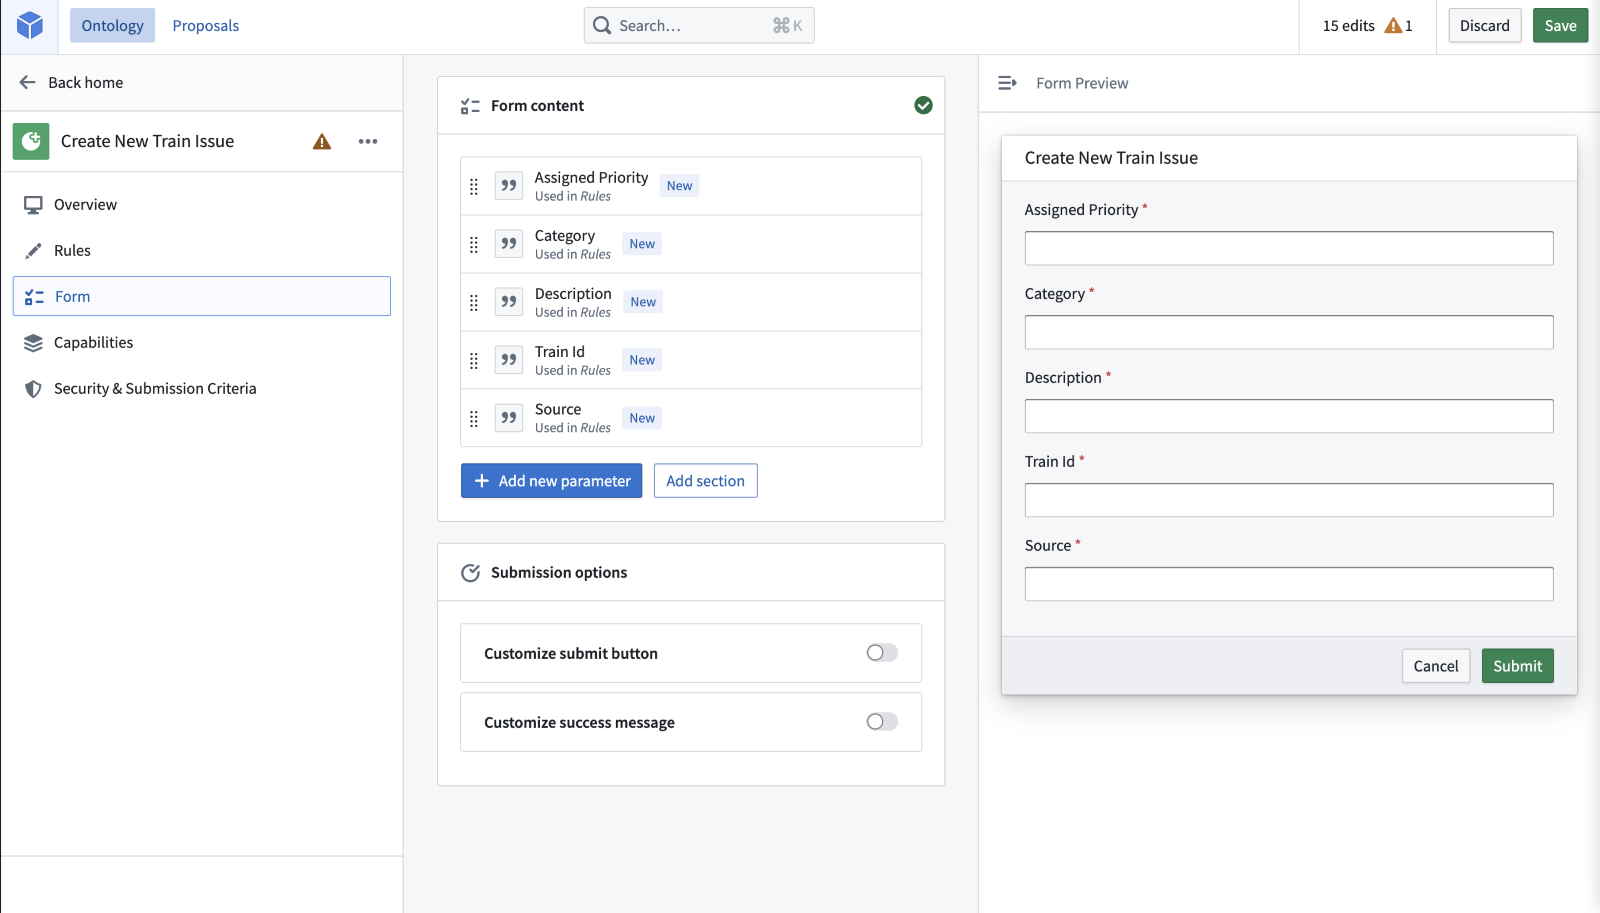
Once we click into a parameter, you can see that there are many ways to customize the way a parameter is input. Remember, a parameter is a field in the form. We’ll look specifically at “Assigned Priority” and “Train ID.”
Making a Field Multiple Choice
When configuring the constraints of the parameter, you have an option to make the field multiple choice. You can manually enter the options (if there aren’t too many, or they aren’t going to change) – or, you can pull the choices from a property of any object set. The latter can be a great way to future-proof your Action against data changes. In this case, we only have three options, and they likely won’t change, so manually entering the options will work for us.
Overrides
As you design your form, you might want users to have different options based on what they've selected earlier, or who they are. With all forms, Foundry lets you dynamically present which field should be shown to the user and how that field should be populated.
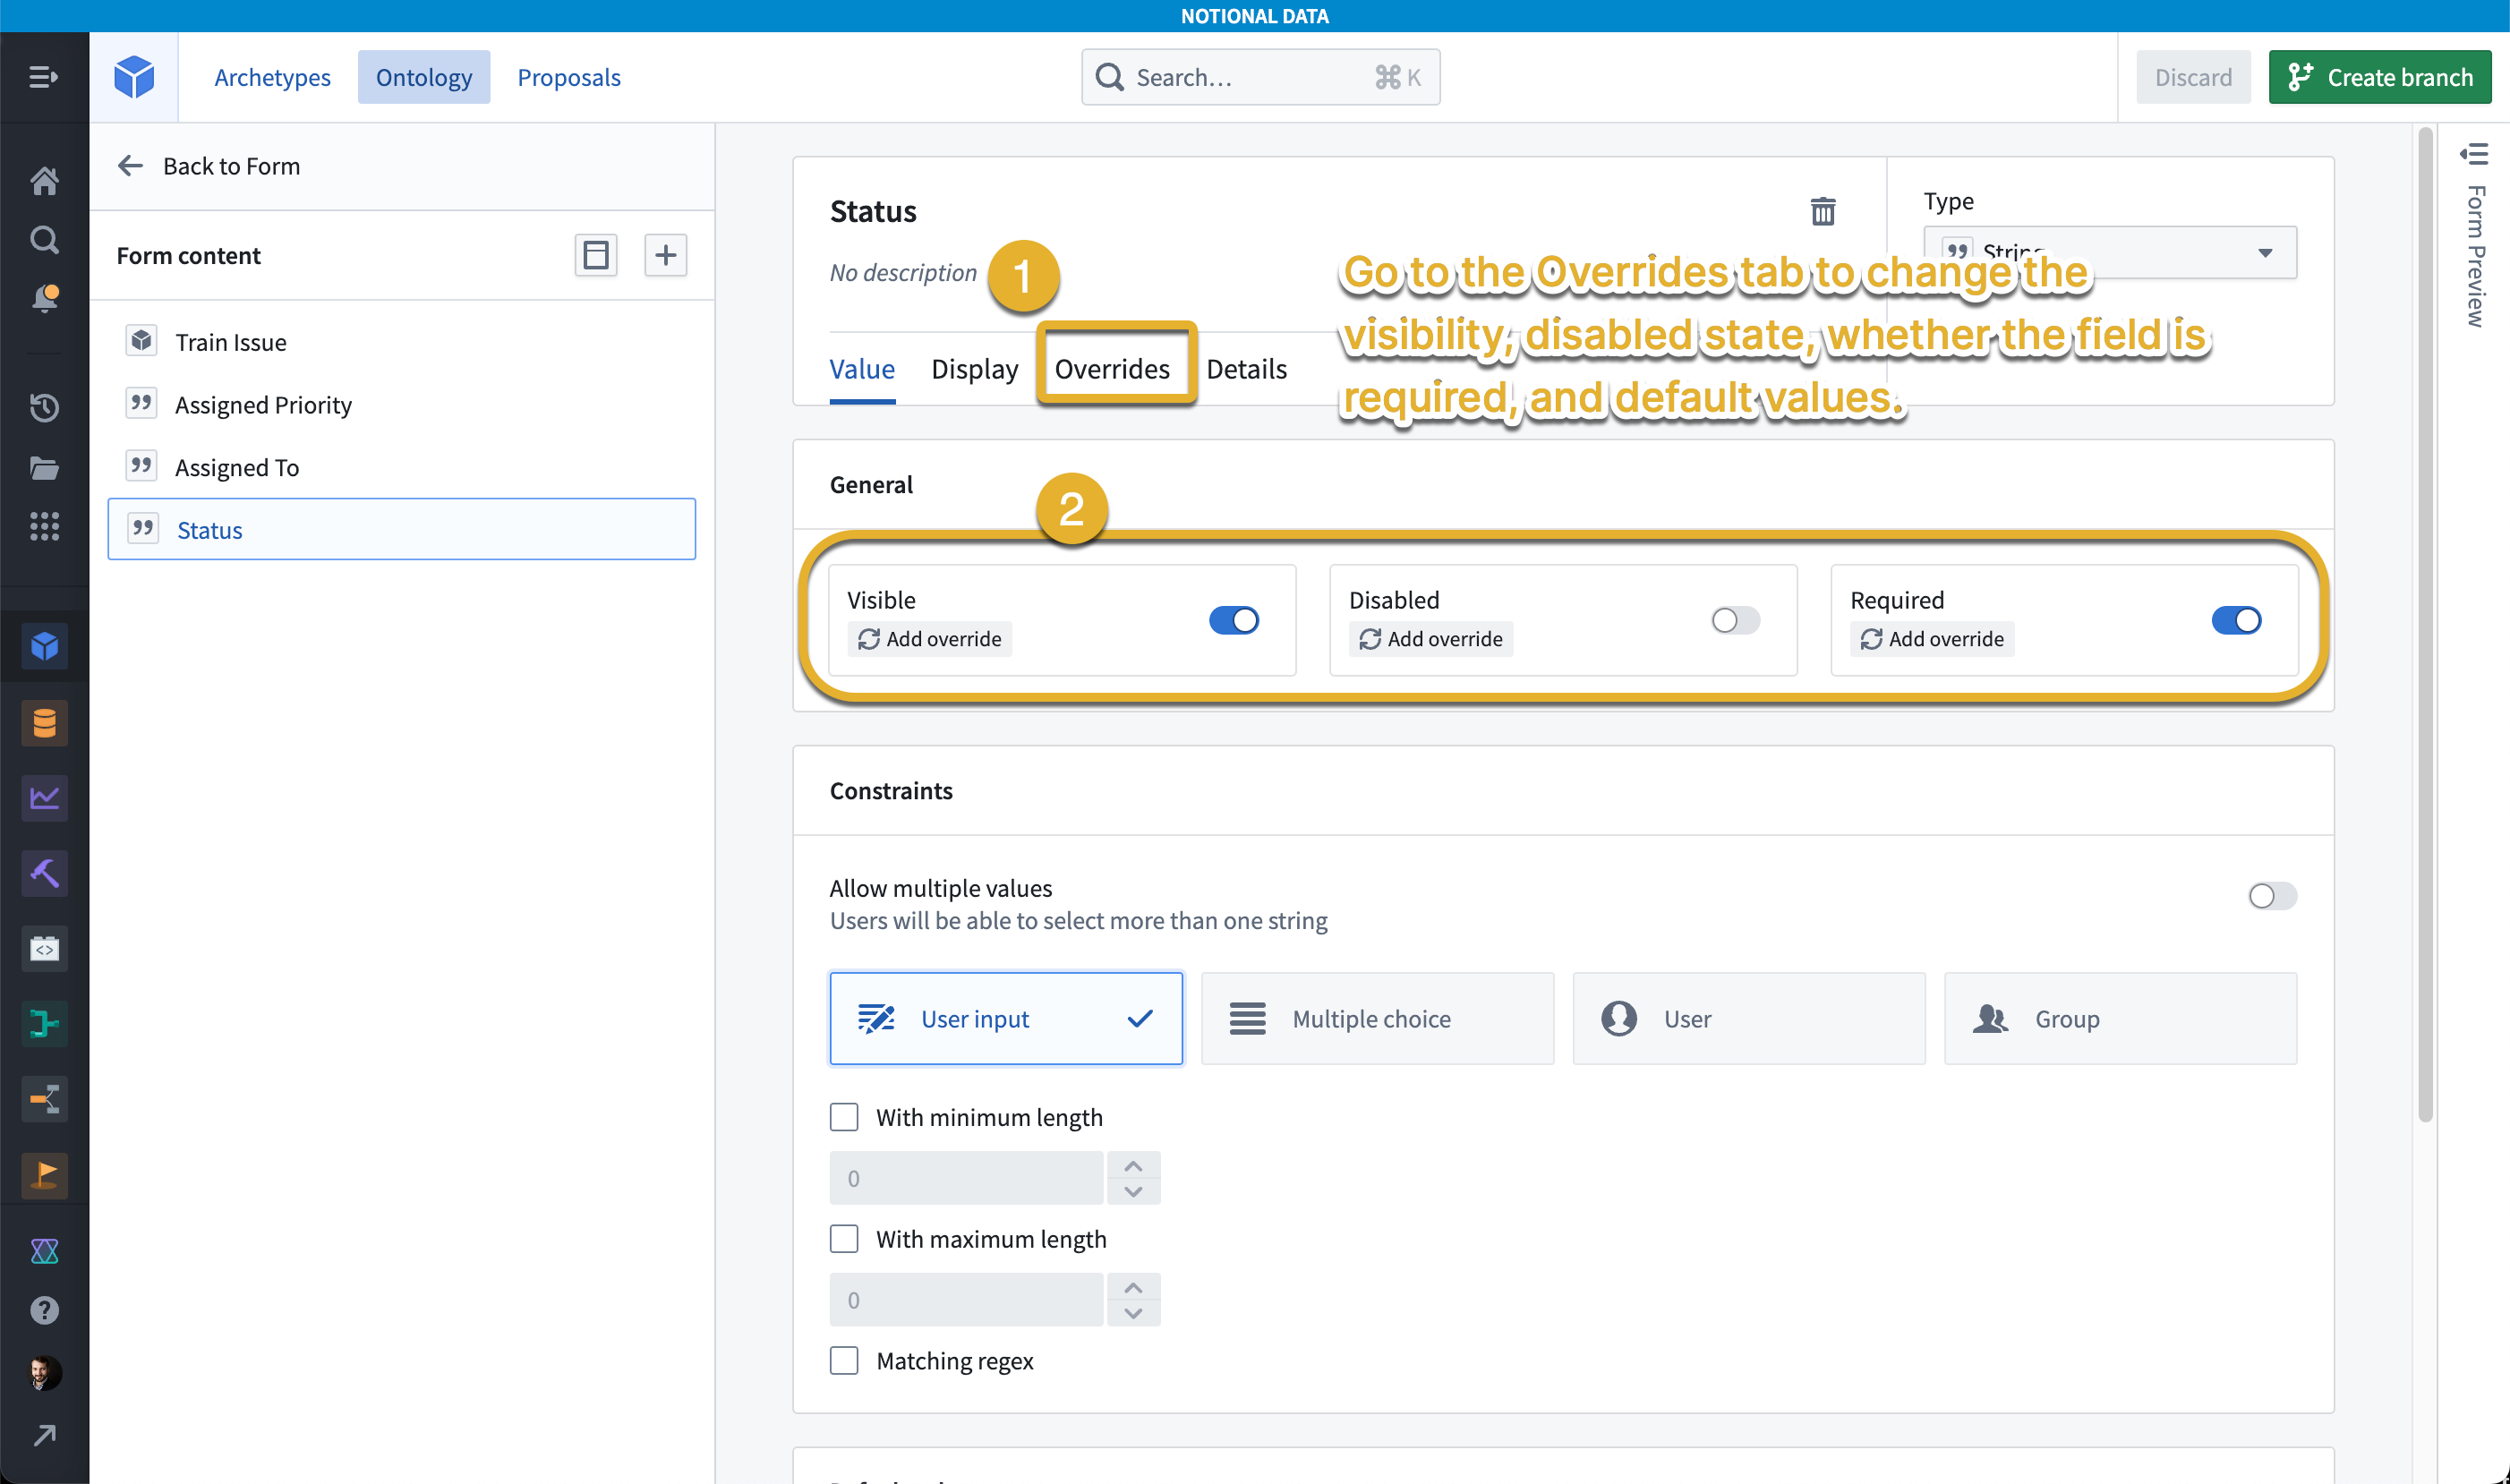
When we click into “Assigned Priority,” you’ll see that you can control whether the input is visible, disabled, and required, as shown in the first circled section.
We may choose to hide or disable parameters for several reasons – for example, if there is a default static value, or we collect the user id or current timestamp, or simply set a random ID, there may not be a need to show it to the user. A shorter form may be less overwhelming for users.
For each of these controls, we can add overrides. Let’s say for example that Gena is allowed to enter a priority for an issue, but Taylor is not (even if he is allowed to create an issue.) I can configure that by doing the following:
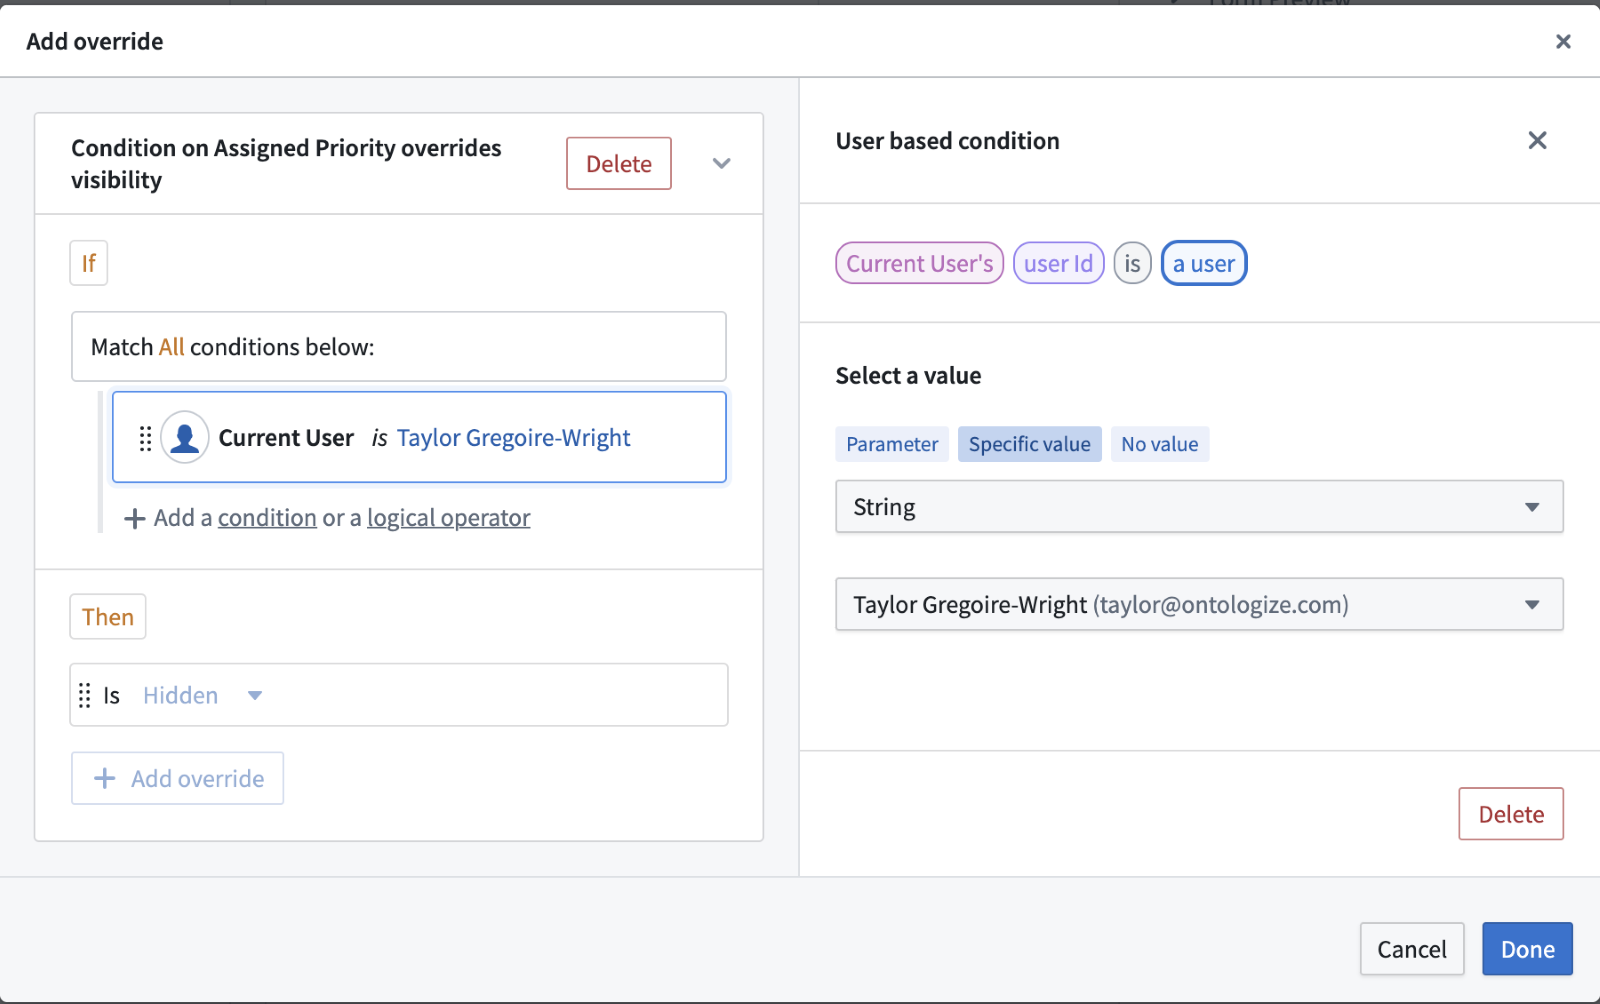
Note that you can also make these qualities dependent on other parameters, but if you choose to do this, that parameter must precede this one in the form. If a parameter will be conditionally available for a user to populate (and won’t be populated otherwise, say, with a default) do not make it a required property, as this can result in unexpected behavior – unless you add conditional logic to make the field non-required for certain users.
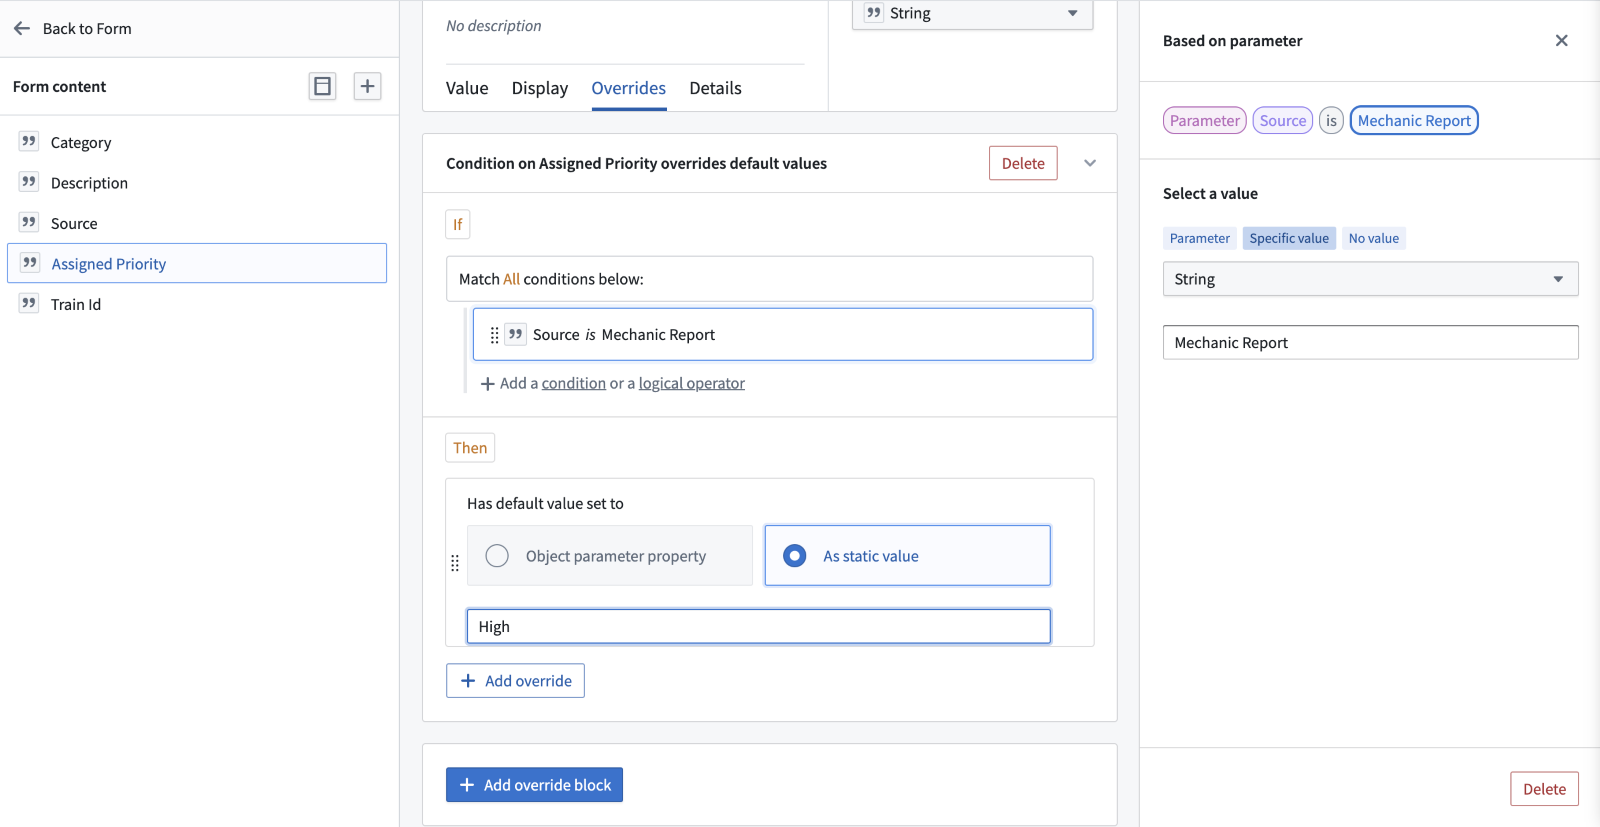
Finally, you can add overrides for the content of a field. While we already covered overrides for determining if a field is visible, disabled, or required, you can use the overrides tab to configure more complex specifications. In our example, perhaps if the issue source is “Mechanic Report,” we may want to default the priority level to high. We can also set additional conditional requirements using RegEx. For example – say we are collecting contact information as part of a survey. Respondents can choose either “phone” or “email” as preferred contact method. Depending on their choice, we can configure RegEx to require either a phone number or email format.
Object References
In our example, each train issue will be associated (or “linked”) to a train. They are linked by the “train_id” column. When your user is filling in which train is associated with an issue, they may not remember the full identifier of the train (the primary key.) Even if they do, they might not format it correctly. If that happens, the link between the objects won’t work.
This is why we use object references. We can avoid issues here by making the “train_id” column an object reference. This means that your user will see a dropdown of actual trains. We do this by changing the type to “Object Reference.”

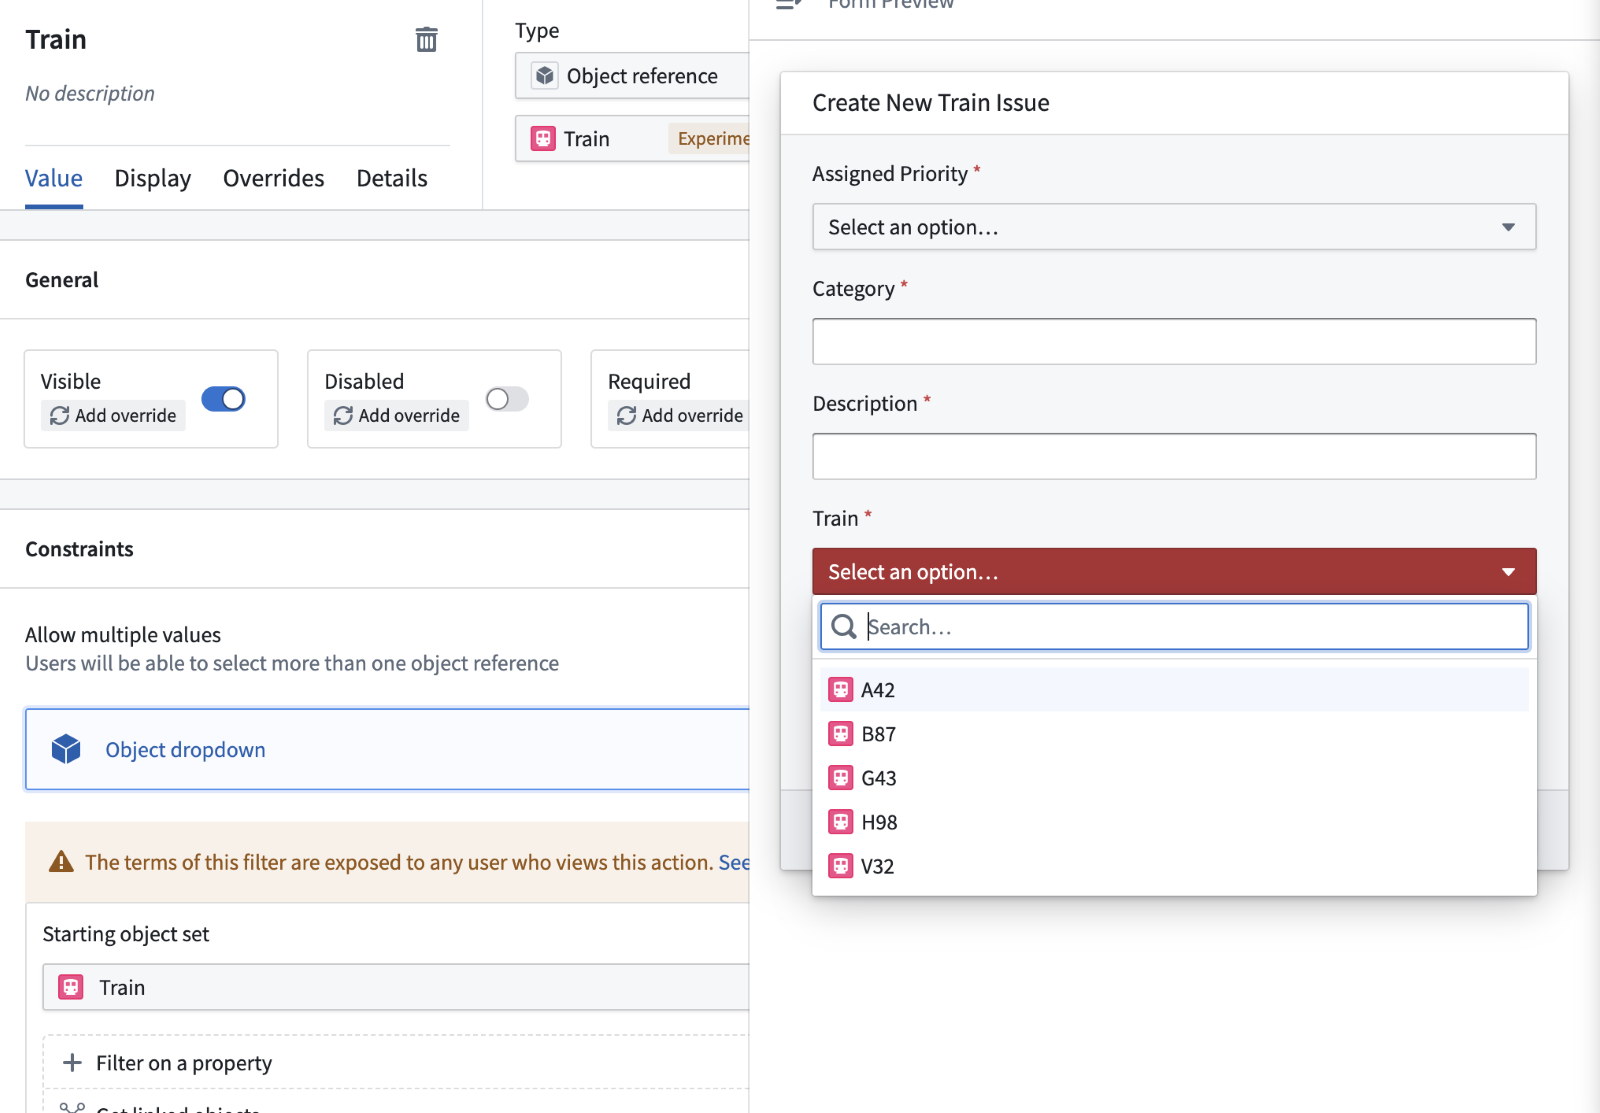
You’ll be prompted to select which object you want to reference. We’ll select “Train.”
Once we’ve set the field to take an object reference, it will show up in the form as a dropdown of objects.
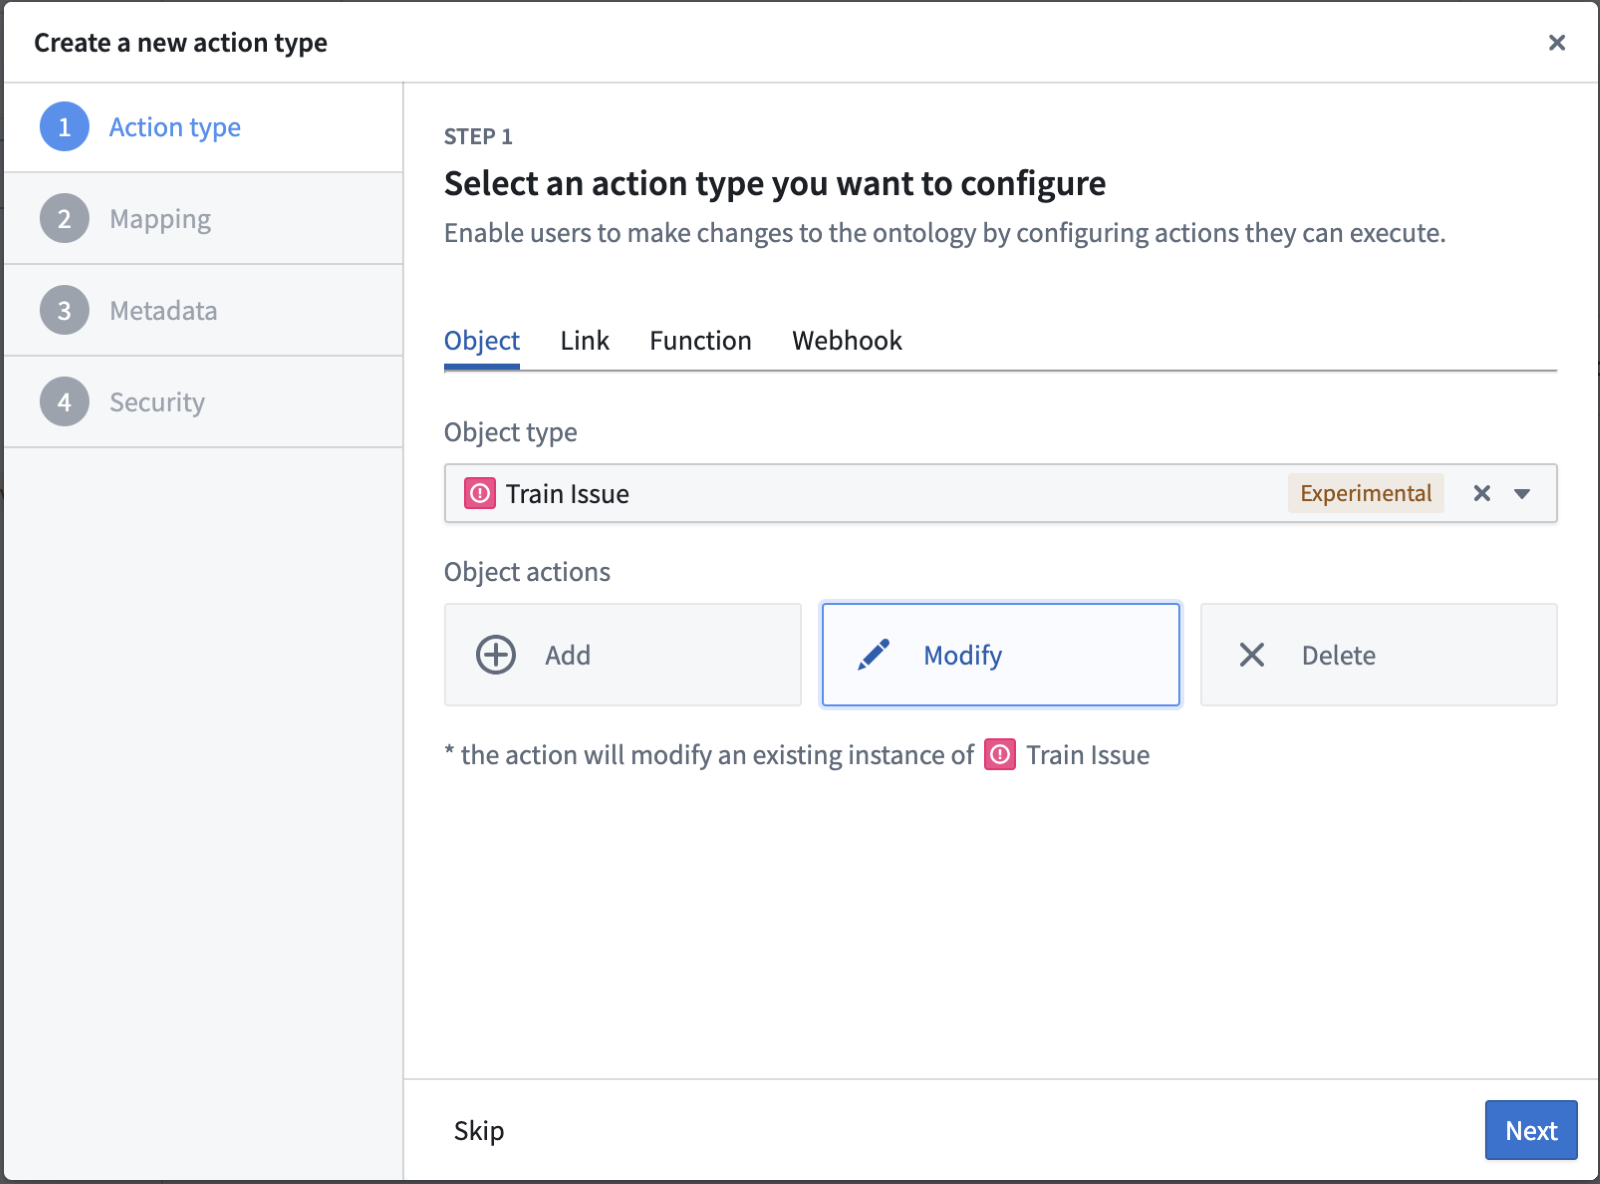
Making a Modify Action
There are a few differences when you’re making a Modify Action. For starters, you’ll choose “Modify” instead of Add. Just like when you’re making an Add Action, you’ll select which properties you want the user to be able to modify. I tend to restrict this to the properties that a user would feasibly need. In this case, the user will likely need the ability to edit the priority, status, and potentially the description. We’ll also want to record who updates it, and when, but just like when we created the Add Action, we’ll record it automatically and won’t show those fields.
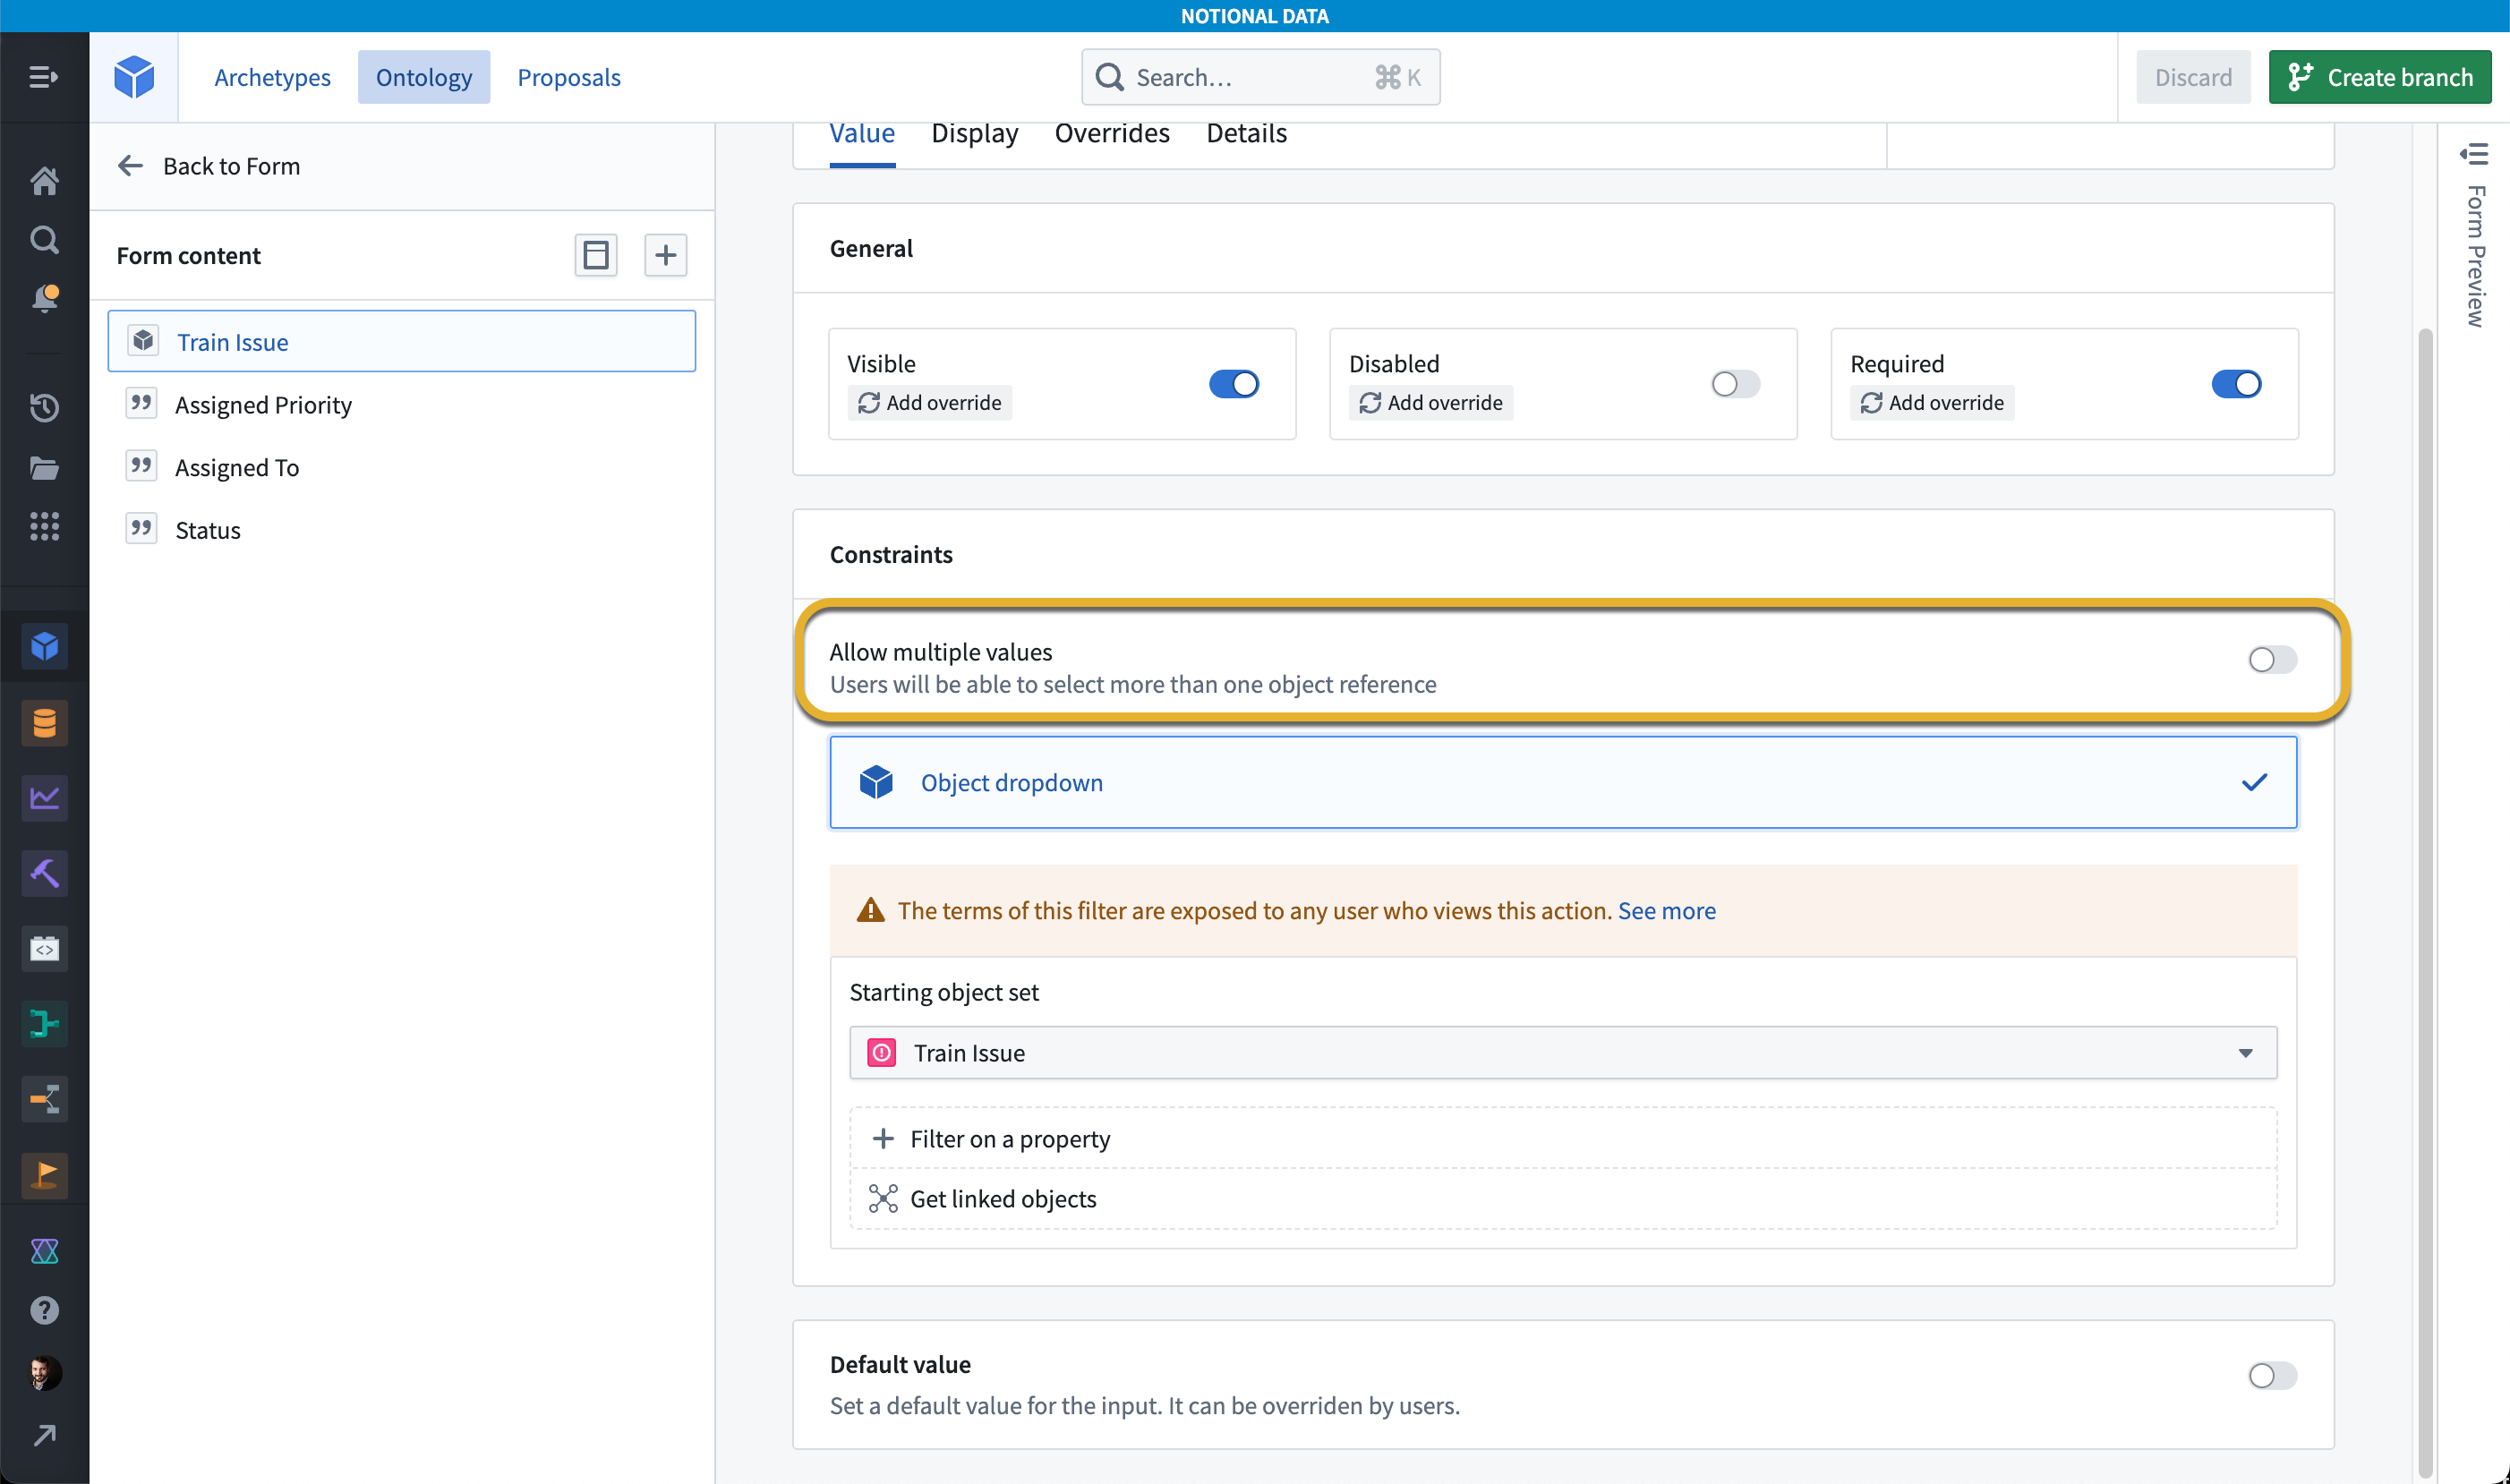
The next difference is that the train issue ontology object is now a parameter in your form. After all, if a user wants to modify a train issue, they’ll need to select at least one. At this point, you can make this a bulk Modify Action by toggling “Allow multiple values.” Note that if you do configure the Action to work on multiple objects, it will give the same updates to all of the selected objects.
The other difference is that the default for every other field will be automatically set to the corresponding property of the object in question. This is generally a good practice – it's convenient if, when your user opens the form, it’s filled out with its prior values.
Otherwise, when configuring a Modify Action, you’ll have all the same configuration opportunities that we discussed in the Add Action section.
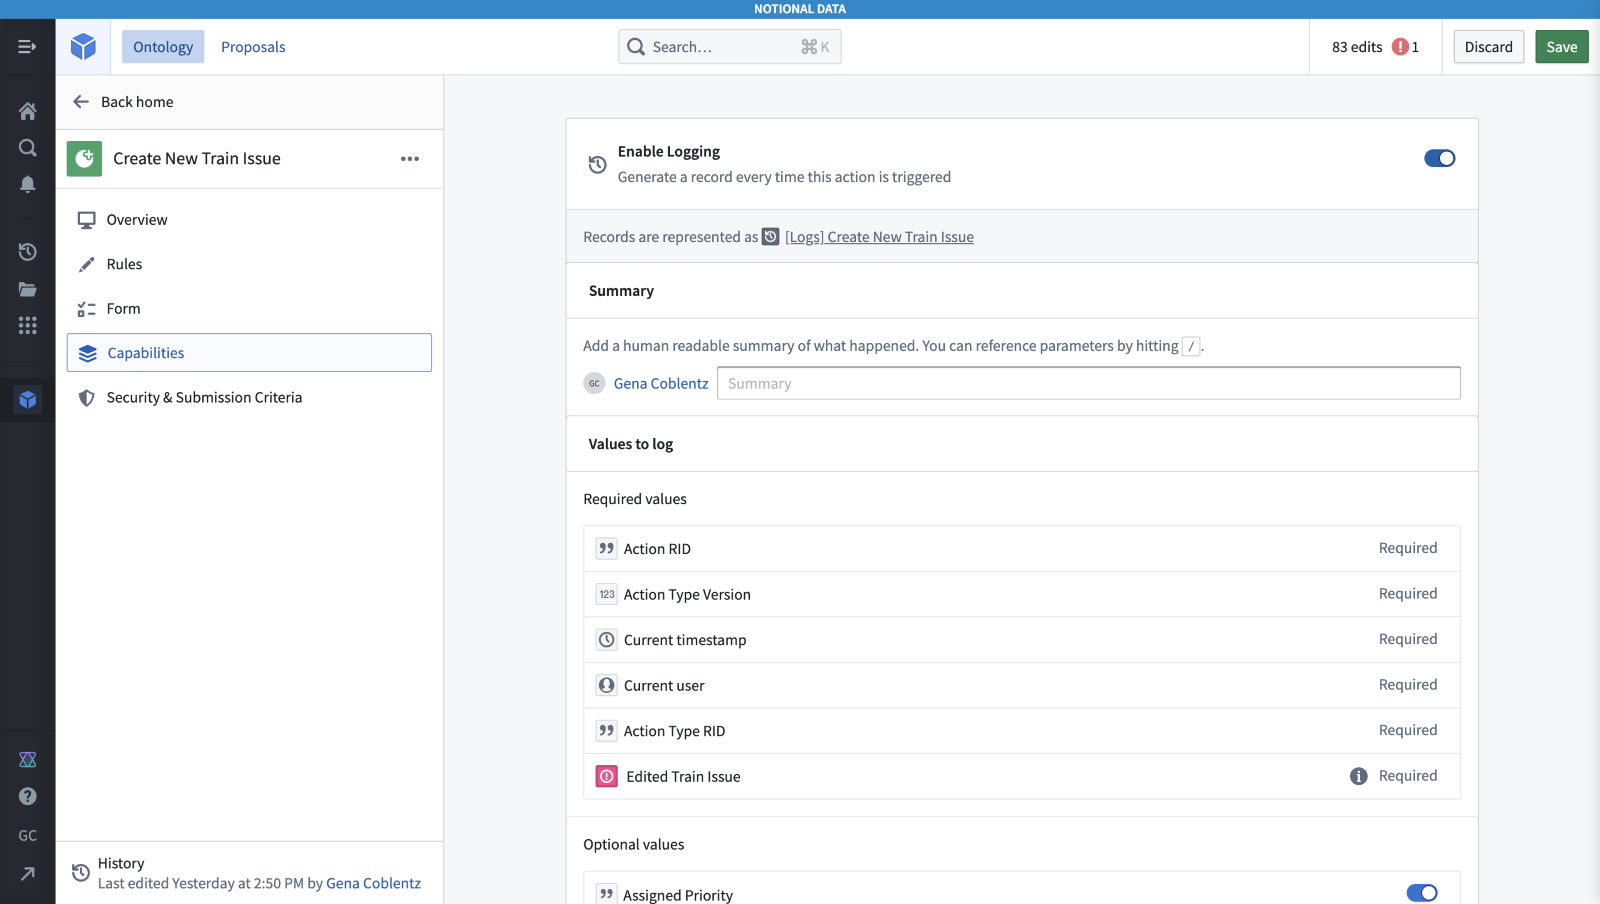
Logging
Sometimes the history of changes that are made to an object is a valuable source of data itself. You can easily switch this on in the Action configuration by toggling “Enable Logging” in the capabilities tab. By doing this, you’ll be able to create a row of data every time the object set receives an edit.
Your Next Steps
Now that we’ve covered the fundamentals of how to create an Action, there’s still more to consider. For people who are building applications for others to use, we’ll cover the basics of integrating Actions into applications. For people who have more technical experience, we have outlined future learning.
Surfacing an Action
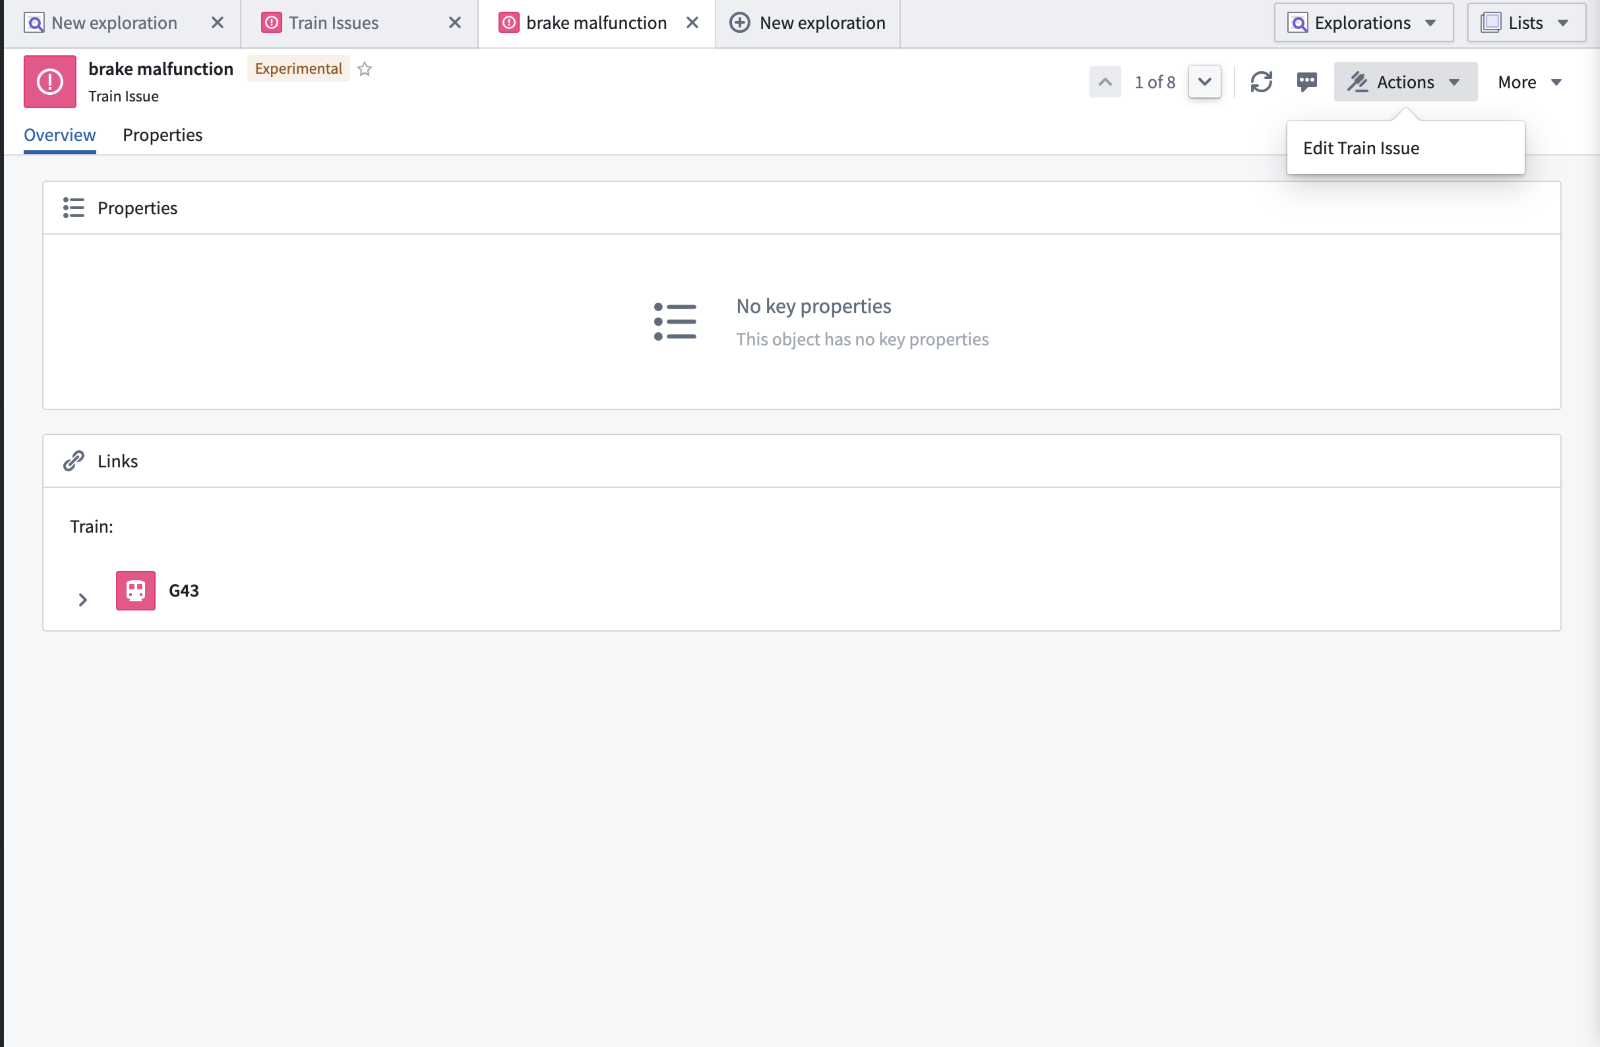
You can think of the form as a packageable component that you can put where you want. So, once we have determined what an action does and have designed the form that users will interact with, we’ll want to put it somewhere that they can use it. Right off the bat, the Modify Action will appear as an option in the object view in object explorer. This is automatic – all Modify or Delete Actions will appear in the “Actions” dropdown on the object view for the object they act on.
Most often, you’ll want to surface your Action in a workshop application. You can surface an Action in as many applications as you like.
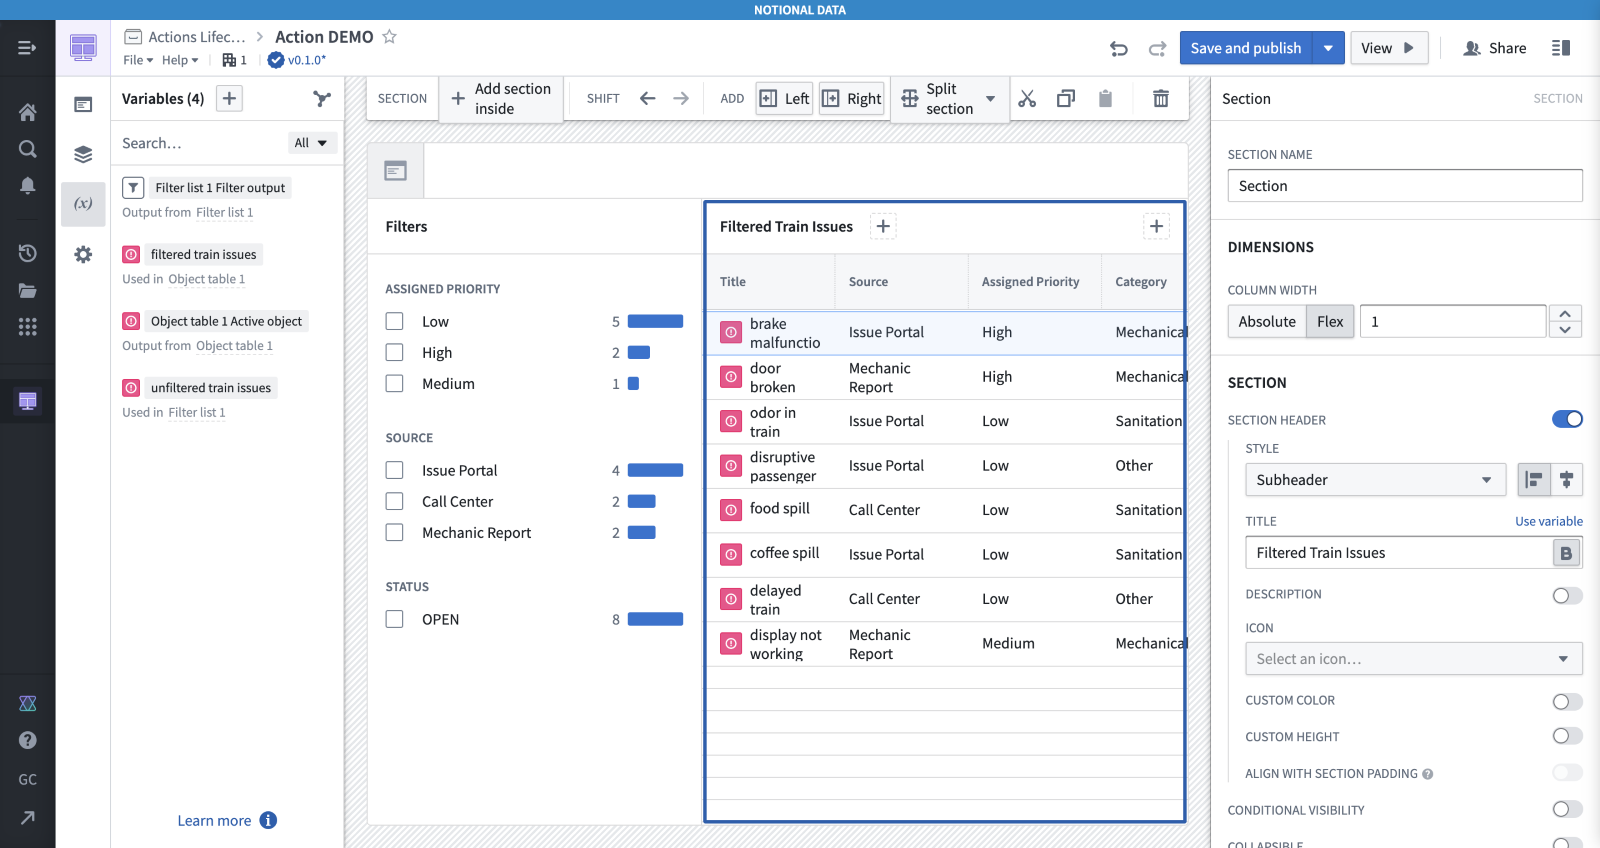
Here is a very simple workshop application where the user might want to carry out the “add train issue” and “edit train issue” Actions. We have a table of train issues, and a few filters to narrow it down.
First, we’ll give the user the ability to add a new train issue. There are several ways to surface an Action: a button, an in-line Action, and in-line editing in a table.
Buttons
Buttons are one of the most common ways to integrate an Action into a workflow.
In-Line Action Form
In line-line Action forms give the user the ability to fill out the form without clicking a button to open it.
In-Line Table Edits
In-line table edits are great if the user will want to make multiple modifications to many objects at once.
Future Learning
As we discussed, Actions on objects are only one kind of Action. Additionally, there are multiple ways to interact with Actions.
- For specifically modifying links between objects, you can apply an action on links.
- If you need more advanced functionality out of an Action, such deriving a value from other properties and storing it, a function-backed Action may be an appropriate solution.
- If you need to edit or notify external systems, you’ll need to use a webhook.
- Object monitors can submit actions automatically when conditions are met.


