
Introduction
Workshop’s widgets let you to build very sophisticated applications. From interactive charts to buttons that let you call external APIs, the built-in widgets have a lot to offer. But sometimes they’re not enough.
What if you want an advanced map? Or complex analytics? Or documents?
The answer is to embed widgets from other Foundry applications inside your Workshop app. You usually do this when:
- You need advanced or specialized analyses and exploration.
- You create a view or analyses in another application but would like to use it many times throughout the platform.
- Your team or organization requires certain standardized views in multiple applications.
- You build analyses and explorations outside of Workshop, but then find that you need to present your work in a more interactive, operational, and user-friendly manner.
In Summary
Before getting into the details, here’s a simple guide for which applications you can embed into Workshop apps and what capabilities they give you:
Quiver
- For when you need advanced and complicated plots
- Computation on regular or timeseries data
Maps
- For advanced mapping capabilities
- Layers that will be reused throughout the platform
- Geospatial timeseries
Notepad
- To surface documents
- To create a document
Vertex
- For a simulation
- For exploring and visualizing specific objects and their links in a more ad-hoc manner
Workshop
- For when you have a standard portion of a workflow (or view) that may get reused in multiple different places
Helpful concepts to understand
Template
Imagine you have made an analysis about some object in your Ontology. In order for colleagues to re-use your analysis, you would need to let them pick different objects and configure the analysis so it would recompute for whatever objects your colleagues select. We often call this a dashboard. Dashboards are examples of a more general idea we refer to as Templates. When you embed an application in a Workshop app, you usually embed a template made in that application. For example, if you want to embed a Notepad document, you would first configure that document so that it updates in response to what the Workshop application’s users have selected in Workshop. In this case, each individual user is generating a new document based on your Template.
Widget
Widgets are the building blocks of a Workshop application. Components like tables, graphs, buttons, and pivot tables are all examples of widgets that you can use and shift around to create a customized and interactive experience for your user. In this post, we’ll specifically be exploring widgets that allow you to template work from other applications.
Variable
Variables are how you store information in a Workshop application. A variable can be an Object set, Object Set Filter, Array, Boolean, Date, Filter, Numeric, String, Timestamp, or Time series set. Widgets get their information from variables. Variables can be dynamic or static.
Parameter
Parameters are the inputs that a template can accept from the application it lives in. Once you’re in Workshop, parameters can be filled by variables. In Notepad, parameters are called “Template Inputs”.
In the context of this post, Parameters only exist inside Templates whereas Variables exist across your Workshop app. You can think of Template Parameters as slots that Variables go into, like a coin going into a vending machine. If a Template has a Parameter, but you haven’t defined and assigned a Variable for that Parameter, then nothing will show up in the Template.
Quiver in Workshop
Why you would use it
Quiver is the analytical tool for the Ontology. Although organizations often use Quiver to work with timeseries data, it has advanced computational capabilities that are useful beyond time series analysis.
Using native Workshop functionality, you can view and summarize timeseries data and run variable transformations on non-timeseries data. However, there is more advanced functionality that is available only in Quiver, which is why you’d want to embed a Quiver dashboard using the Quiver dashboard widget in Workshop. You can plot and run computations on your time series data using Quiver. More generally, Quiver offers a bit more dexterity with data than Workshop does – you can do more complex mathematical operations (on time series data and otherwise) and perform computations on charts, such as adding the values from two charts together. Lastly, Quiver dashboards provide unique opportunities for visual customization, especially through the use of Vega plots.
Why wouldn’t I just use a Quiver dashboard alone?
There are a couple of scenarios when you are better off embedding a Quiver dashboard in a Workshop application rather than simple using the Quiver dashboard as the final product.
- Workshop is a better option for interactive and user-friendly operational workflows. If the Quiver component is supporting an operational process, the application should be built in Workshop.
- Even if the application does not need to be operational or responsive, you’ll have more control over the layout and design of a Workshop application to create the best visual experience for your user.
- It’s easier to set up complex filtering capabilities in Workshop. The embedded Quiver chart can be fed from a filtered object set in Workshop, which enables your user to see a smaller subset of time series data which is most relevant for their purposes.
How to do it
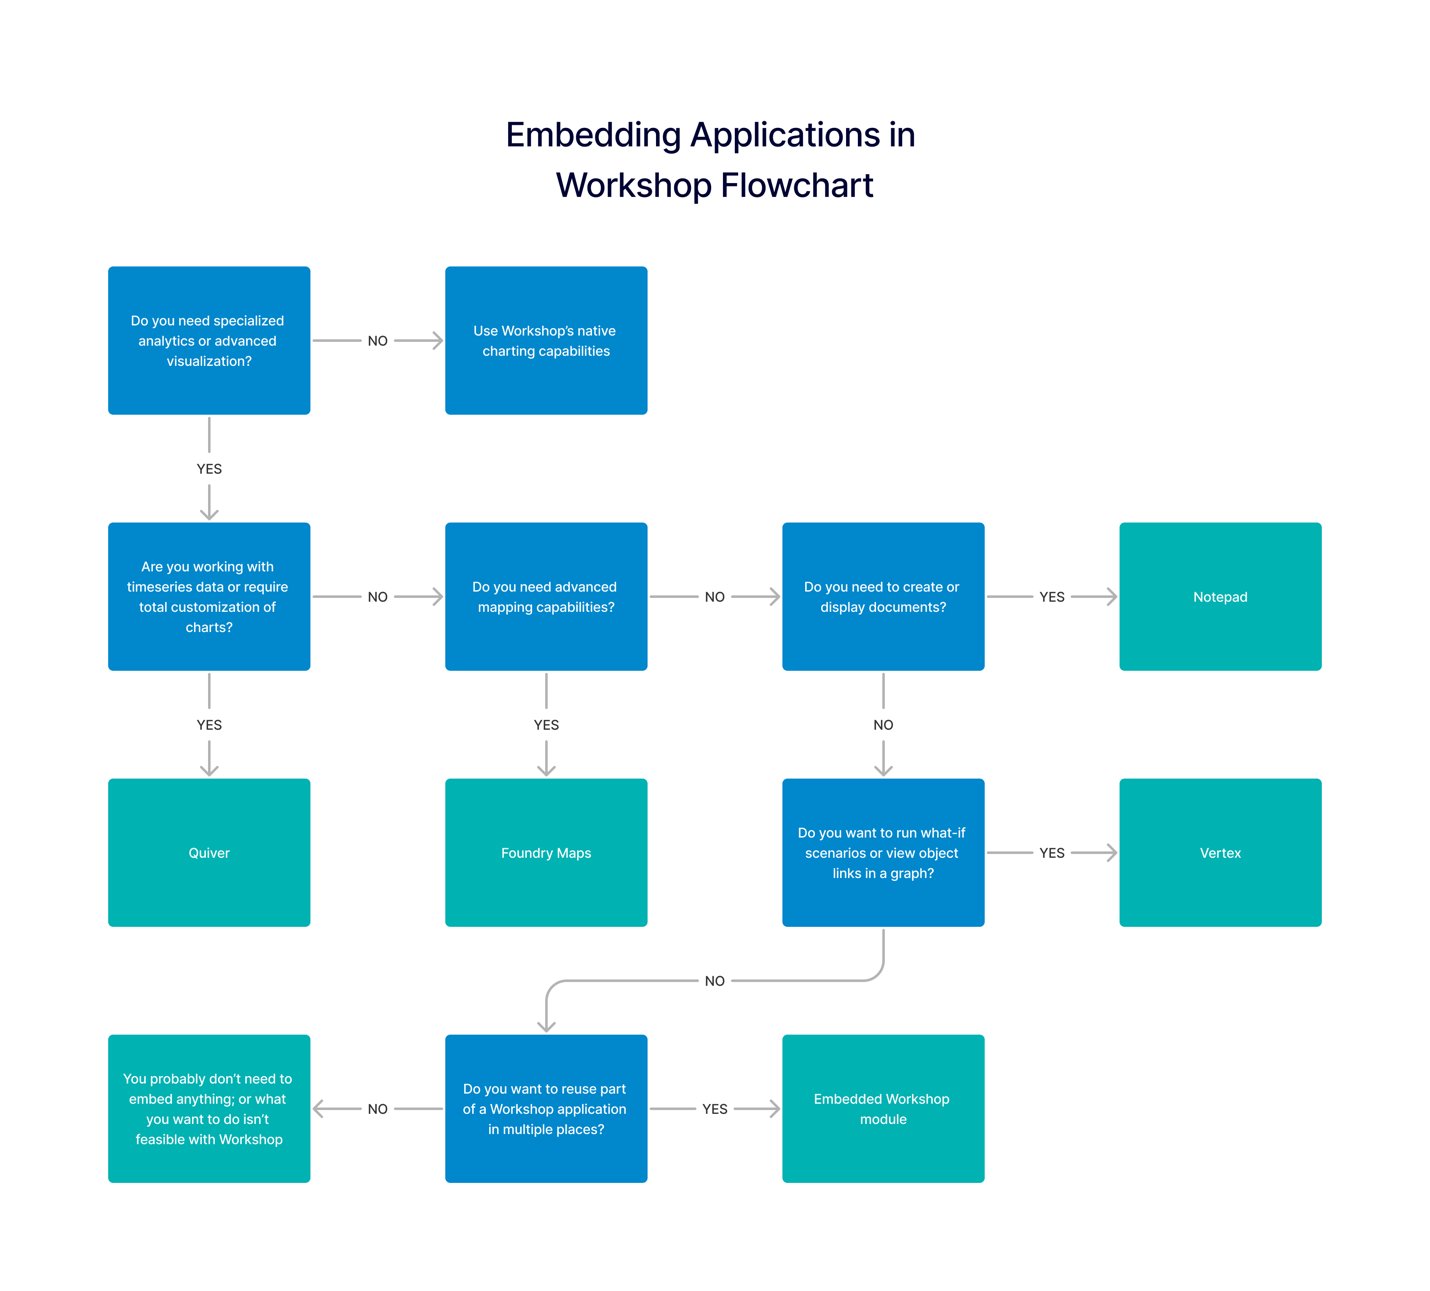
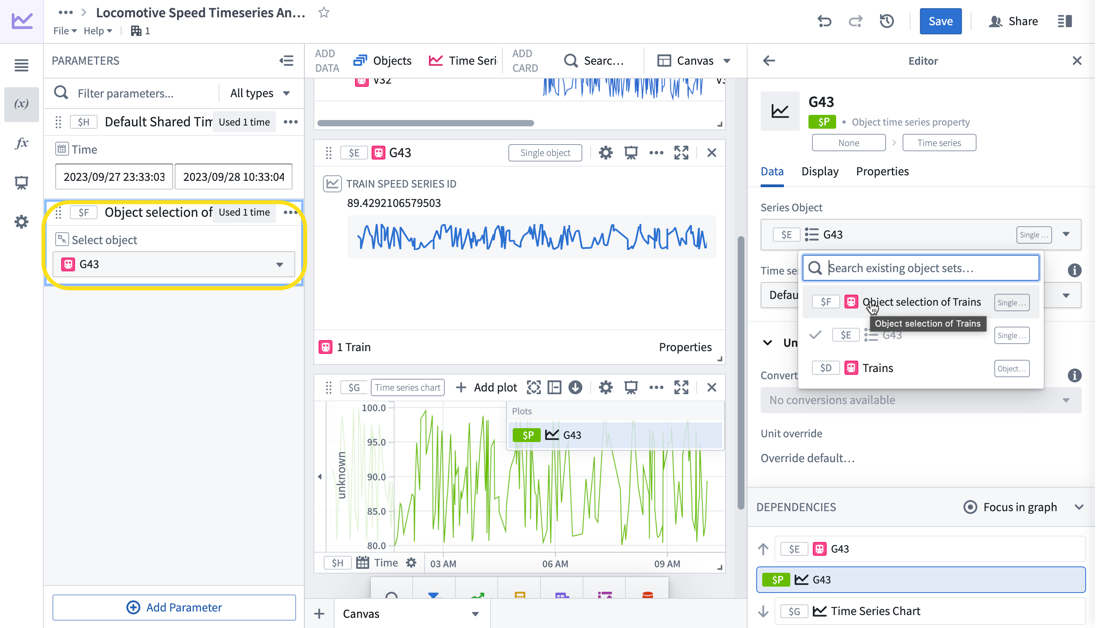
First, you’ll need to create a Quiver analysis. In this example, we’re starting with an object table of the trains, and selecting “pop out object.”

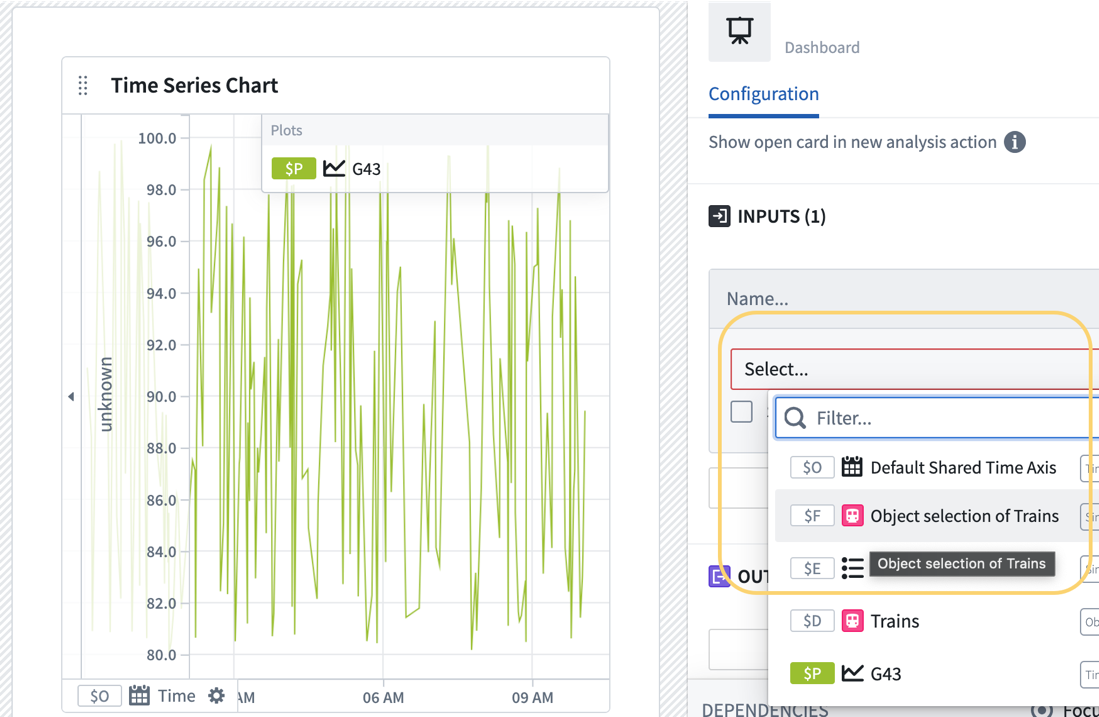
You’ll see on the left that it creates an “Object Selection” parameter. Add a new widget and search for “Object Time Series Property.”

In the settings on the right, change the input on the time series property chart to “Object Selection of Trains.” This chart is displaying the default time-dependent property.
Next, you’ll need to add the components of your analysis that you’d like to embed into a dashboard.
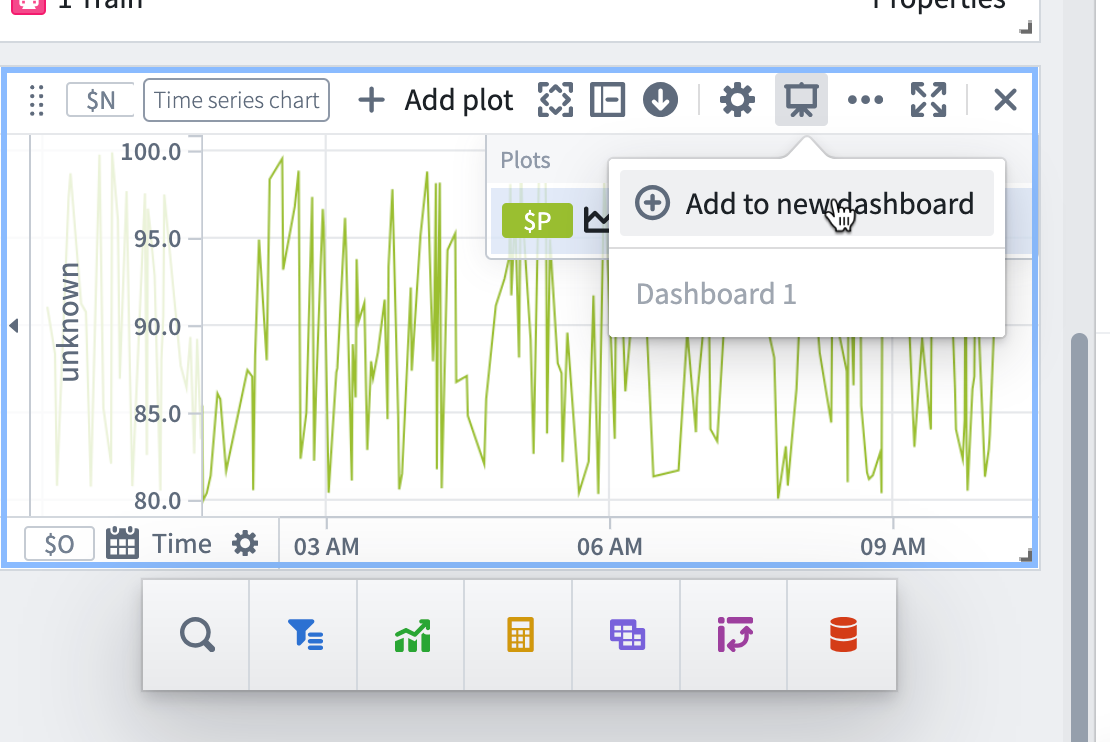
Once you’re in your dashboard, you’ll need to specify which variables get fed into this analysis. These are the variables that the Quiver dashboard widget will be inheriting from the Workshop application where it's embedded. In this case, we’ll want our dashboard to take in a single object so it can display the default time series property (speed.) Select the input to be “Object Selection of Trains.”
Save it with a meaningful name and publish it. Remember that every time you make a change to this template, you’ll need to republish it.
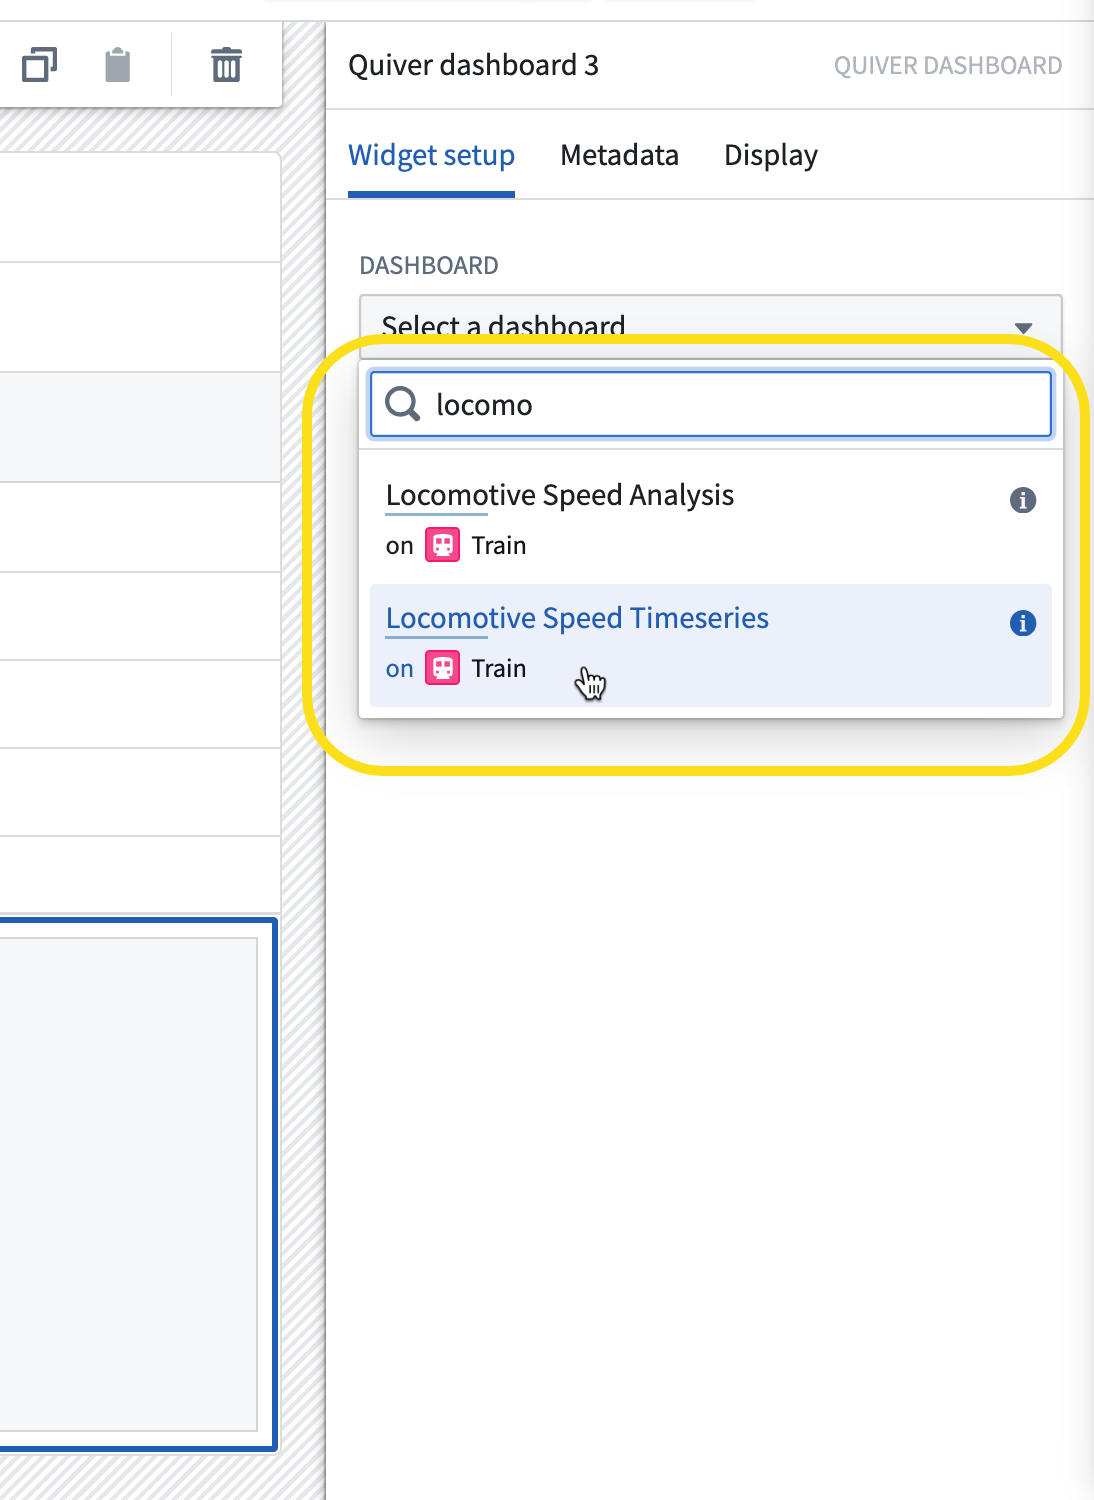
Finally, you can add it to your workshop application by adding a Quiver Dashboard widget and selecting your dashboard.
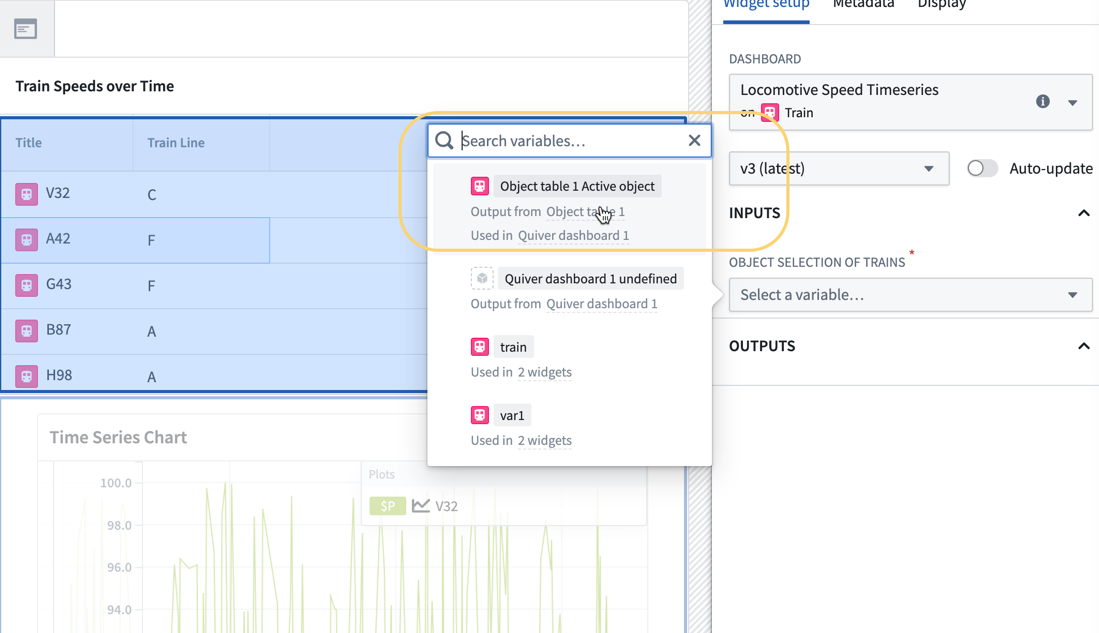
Set the input to the Object Table active object, or the variable of your choice (assuming it’s the same kind of variable that the dashboard expects – in this case, that’s a single object.)
Things to consider
An embedded Quiver dashboard won’t be a dead-end in your Workshop application. If you define an output variable in Quiver when you set up the Dashboard, Workshop will be able to use outputs such as an object selection from the Quiver dashboard. In other words – a user selection from an embedded Quiver dashboard can feed into other widgets in a Workshop Application.
If you’ve updated your Quiver dashboard, republished it, and aren’t seeing the updated version in workshop, check that you are on the latest version of the dashboard in the widget configuration panel in Workshop, or set it to auto-update. If the application is actively in use for business-critical processes, you may not want to auto-update to protect against breaking changes propagating to users during business hours.
Notepad in Workshop
Notepad is “Ontology-Aware” meaning it can display Ontology objects and charts from object-exclusive applications such as Quiver. However, it can also display visualizations from non-Ontology applications, such as Code Workbooks and Contour. Notepad’s ability to interact with non-Ontology applications and then be embedded in Workshop makes it a convenient way to bring together the ontology and tabular sides of Foundry.
There are several ways you can interact with Notepad through Workshop. Additionally, you can export a Notepad as a PDF from Workshop.
Embedded Document
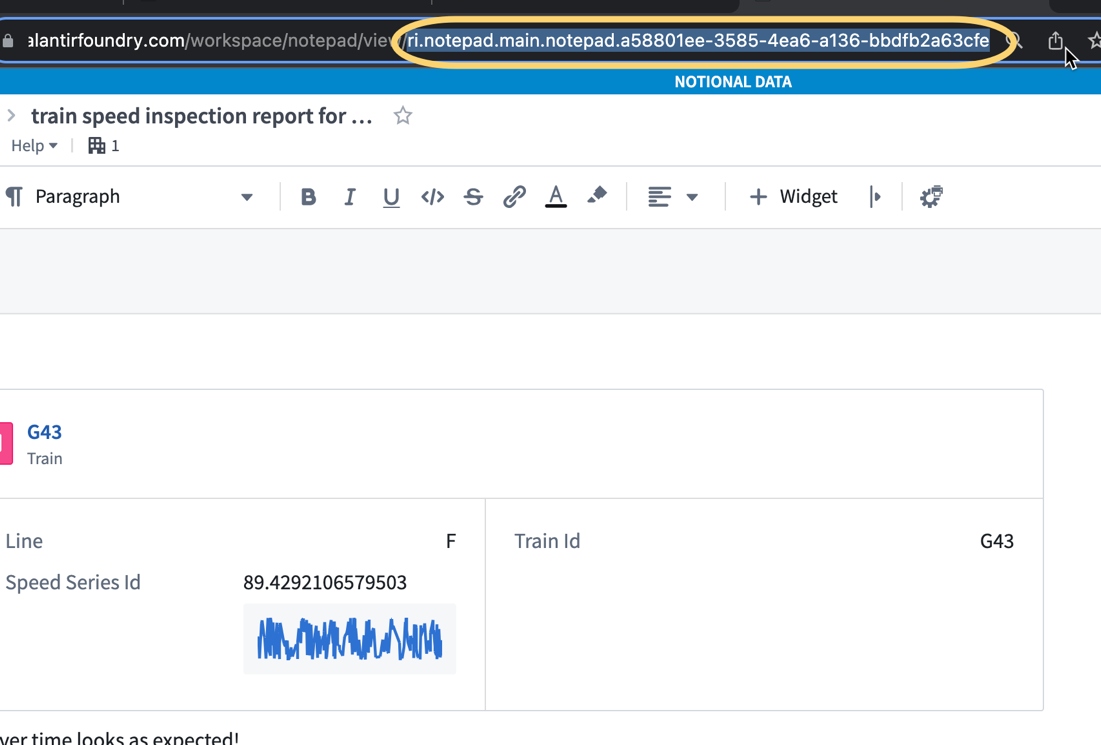
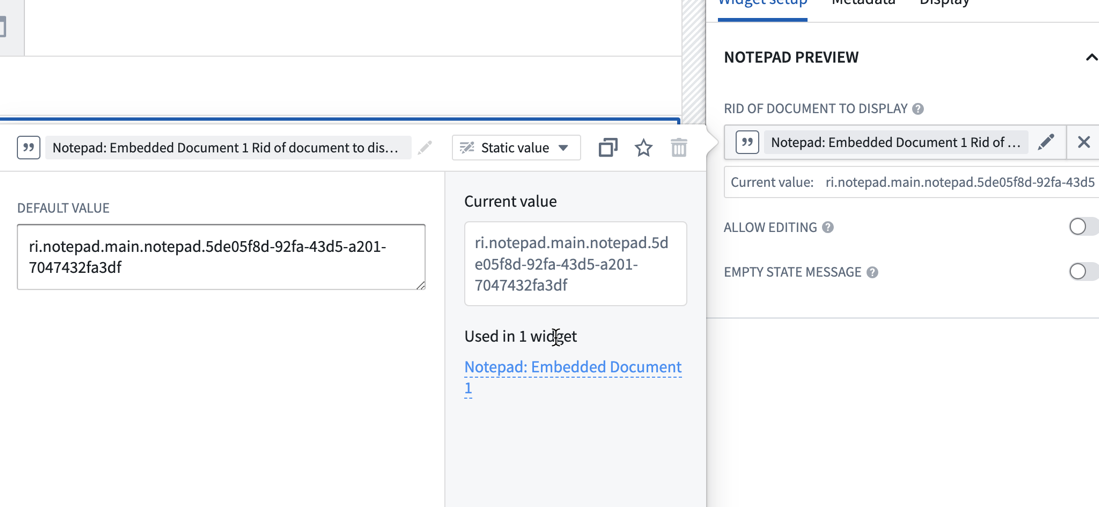
This is the simplest way to use Notepad in with Workshop. In this case, pass in the Notepad RID (which you can find in the URL of the Notepad) and Workshop will display the Notepad. You can also enable edits to the Notepad. In theory, the variable supplying the RID can be dynamic, however, I would use the Linked Documents widget if the notepad should change depending on an object in the Workshop.
Linked Documents
When you reference objects in a Notepad, the Notepad will become automatically associated with those specific objects (not the object type.) There are several widgets within Notepad that will create a link to an object: Object Property, Object Media Preview, and Object Card. This is not an Ontology link; rather, it’s a way to keep track of which Notepads mention this object. In this example, we’ve made a few Notepads with an Object Card for Train G43.
Back in Workshop, when we select the “Notepad: Linked Documents” widget, we’ll be prompted to give an input that is an object set containing a single object. In this case, we’ll use the active object from the table, and it displays all the documents linked to the object.

Generating a Notepad from a Template
While you can edit embedded or linked Notepad documents from Workshop, your users may want to create an entirely new document with the click of a button. Notepad templates enable this functionality. When you create a Notepad Template, you’re making a skeleton for the resulting document and specifying which inputs it can take. For this example, we’ll look at the Row Generator Table widget.
The row generator table widget is useful because you can specify which columns you’d like to have, and then it will expand with the number of rows of the object set it gets fed in workshop.
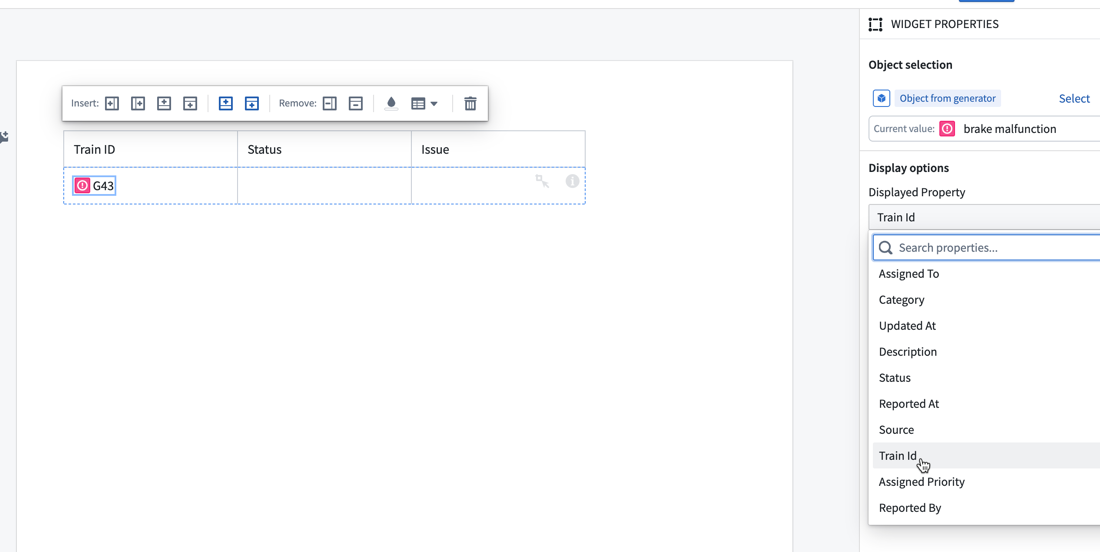
First, you’ll select the “Add Widget” button, and search for the row generator table. You’ll need to create a Template Input that is an object set. In our case, this will be the Issues object set. In the right panel, choose “issues_set” as the template input.

Depending on how many columns you’d like to display, add or remove columns, and give the columns presentable names. In the next cell below the column name, type “/” to add a widget. Select “Object Property”. Once you’ve inserted the widget into the cell, you can select which property to display in the configuration pane on the right. Note that the object set is fixed to “Object from Generator.” Continue this process until you’ll filled out all the columns.
Publish your template.
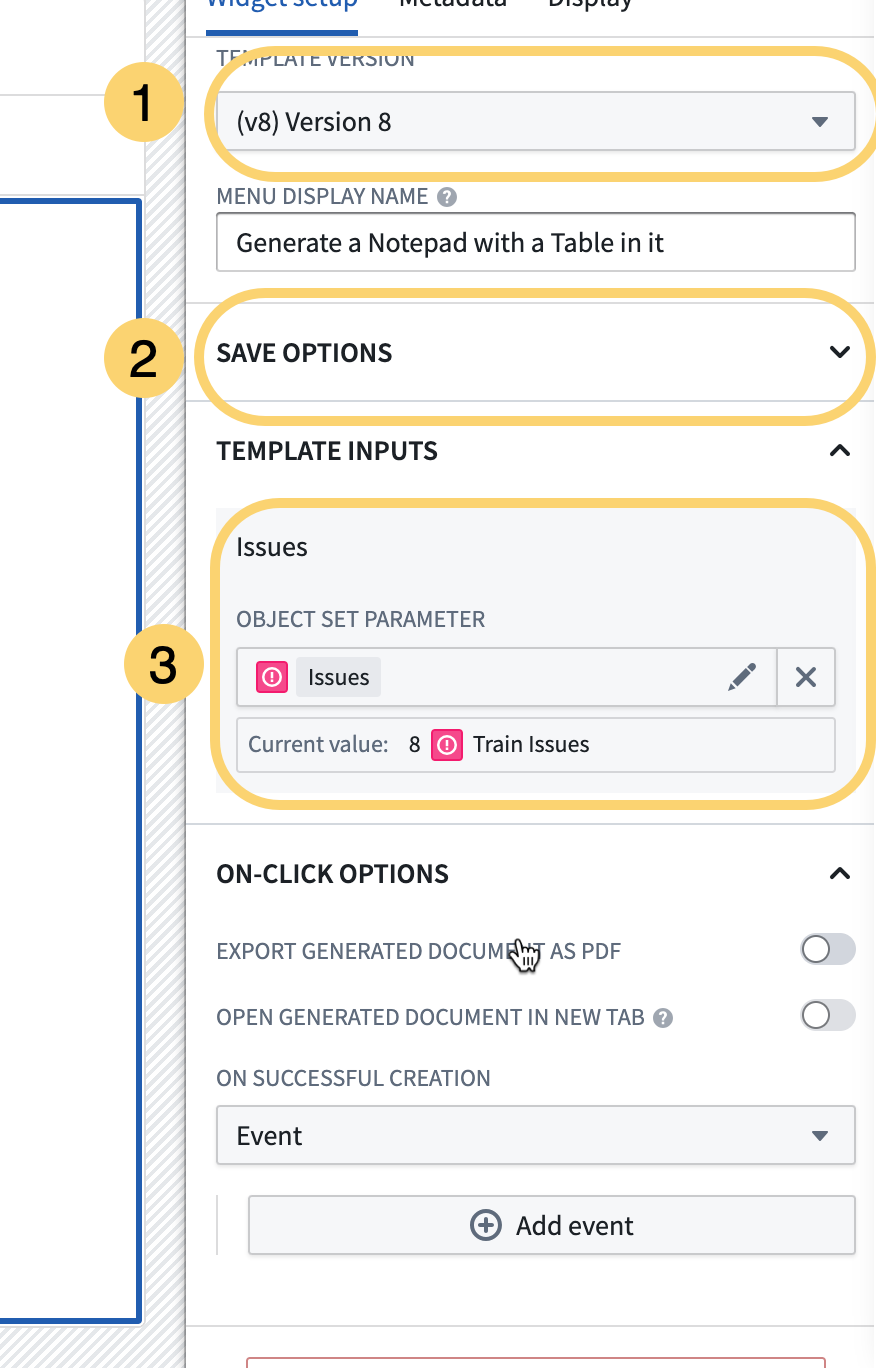
Back in Workshop, add the “Notepad: Template Button” widget. Hit select in the configuration panel on the right, and then search for your template and select it. The Notepad template name will appear under “Document Templates.” Click into it to finish your configuration. Remember to update the template version in the configuration panel to see your latest work.
You’ll have options to configure the document’s name and where it gets saved. Most importantly, every template parameter that you created in your Notepad template (in our case, it’s an object set) needs to get mapped to a variable in Workshop of the same object type. Note that this object set can (and likely should) be dynamic.
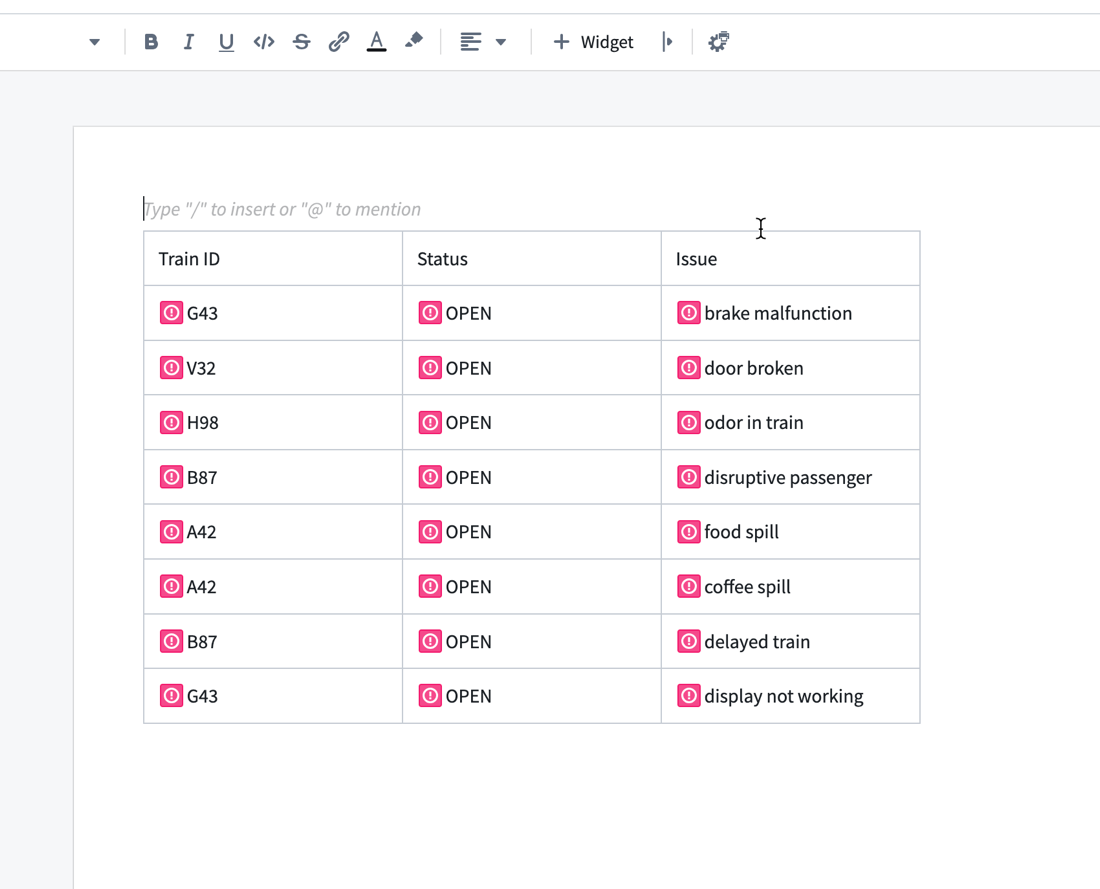
Once you’ve configured the widget and click the button, you’ll get a Notepad document that looks like the following:
Vertex in Workshop
Vertex is a tool that helps you create visual representations of real-world systems, like a network of airports or a supply chain. You can use Vertex to explore how different parts of the system are connected and interact with each other. It also allows you to run "what-if" scenarios to see how changes in one part of the system might affect other parts. This can help you make better decisions and understand the impact of your choices. While you can also run “what-if” scenarios natively in Workshop, Vertex allows for visual, system-wide simulations and analysis, as well as more free-form exploration of objects and their links.
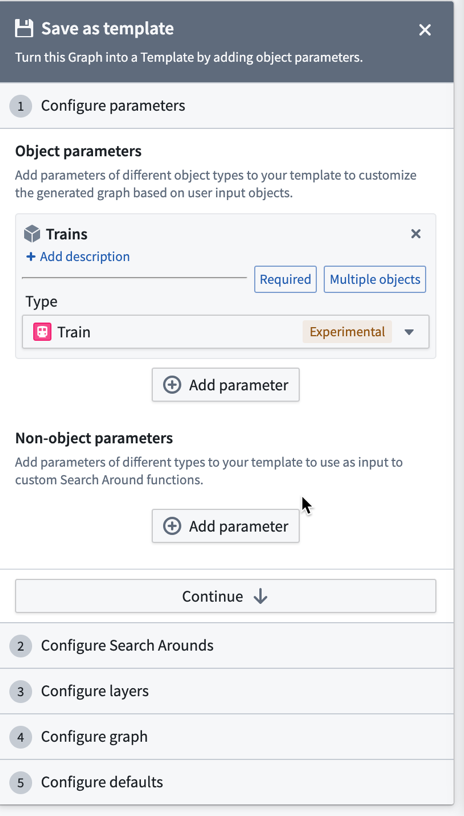
The templatization of a Vertex graph follows a similar process to other applications. First, you’ll save it as a template.

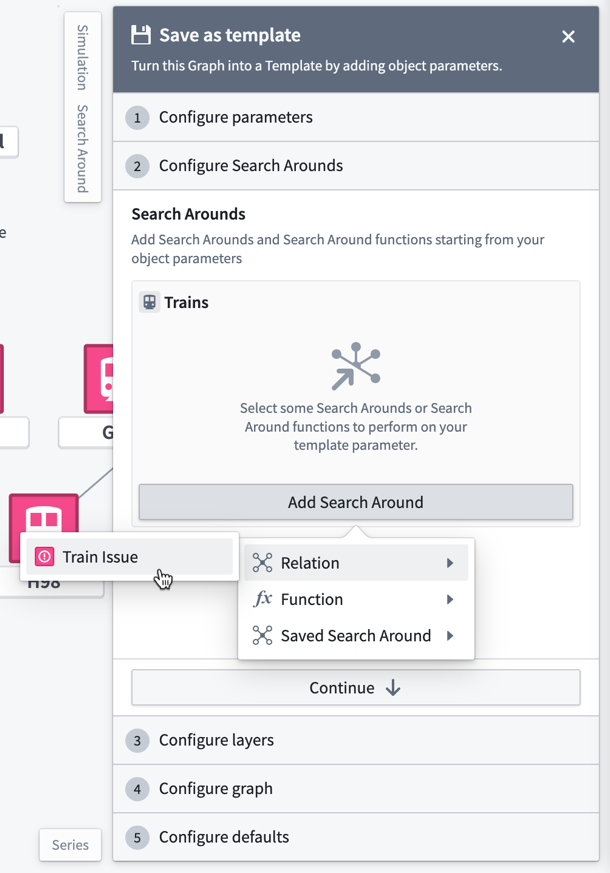
Next, you will be led through configuration steps. This is where you’ll configure which objects the graph needs and the search-arounds it should perform.
Once you’re in Workshop, add a new widget, and select the Vertex graph widget. Select a resource, and ensure you are selecting the template, not the graph itself. This is where you’ll feed in the object set of the object type that you configured your template for. In this example, we’re using “Filtered Trains”
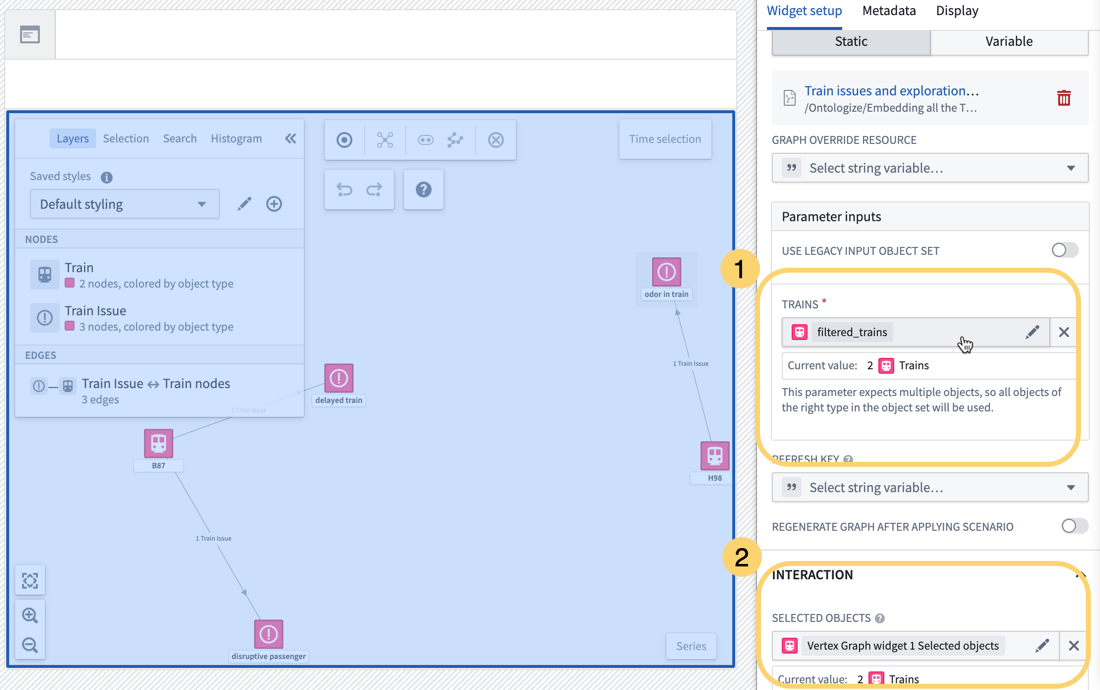
You also have more opportunities to customize the way the Vertex graph surfaces in Workshop, such as the initial viewport, and more. You can also interact with selected objects from a Vertex graph by passing the selected objects as a variable.
Map in Workshop
Foundry has a Map application which is distinct from Workshop (and other tools with mapping capability such as Object Explorer and Contour.) While Workshop has built in mapping functionality, the Map application allows for more advanced maps that you can also templatize and embed in Workshop.
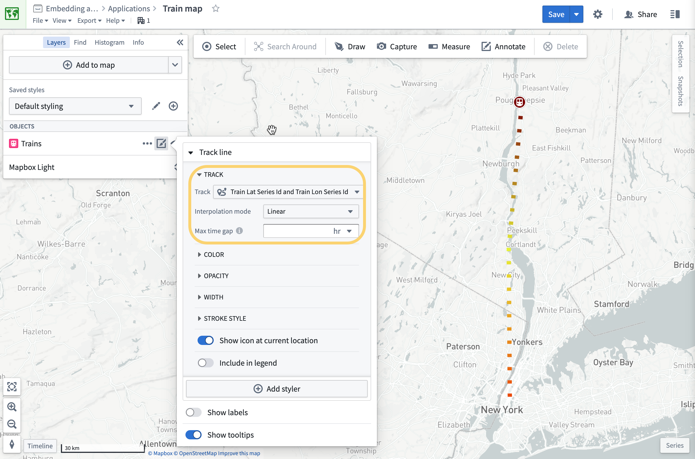
The Map application is designed for in-depth geospatial analysis and investigation, including features like drawing shapes, measuring, and annotating. Map also enables geospatial visualization of timeseries data, enabling you to view an object over time. In this example, we are looking at a train object in the Ontology. We have several timeseries properties on this object – speed, latitude, and longitude. In this map, we’re showing the path and the speed of the train over time.
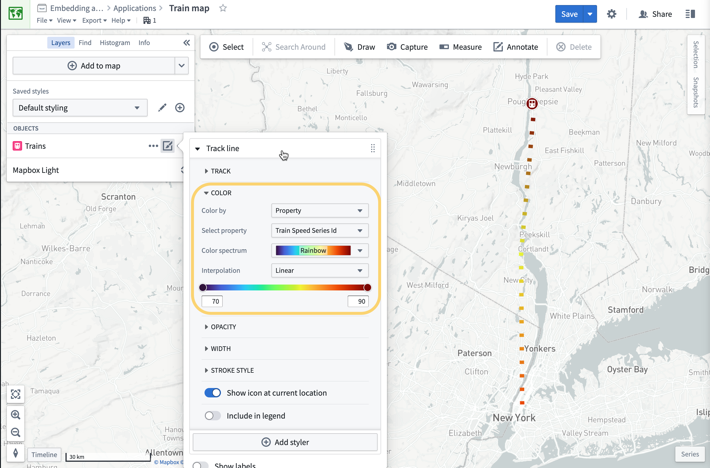
To embed a Map in a Workshop application, you’ll need to save your map as a template. The process for templatizing your Map and embedding it in Workshop is almost identical to the one for Vertex. There are a couple of parameters you can configure during the process of saving the template, but the most important one for Workshop is defining the input object type. Our example is simple, because there are no search-arounds – in most cases, the object type parameter will be the same object that we are displaying on the map, which is the train object.
Workshop in.... Workshop
Sometimes one Workshop simply isn’t enough. If you have a view or mini workflow that belongs in many applications across your organization, you can make a Workshop module to embed in other workshops. There are a few benefits associated with this. For starters, it’s a great way to avoid duplicating efforts. Additionally, if the same workflow exists in multiple places but is edited and configured in one place, it can make the maintenance of applications much easier, given you’ll only need to make the change in that one application. Lastly, if you know you want a specific workflow somewhere in the larger Workshop module but don’t know exactly where or at which step, embedding another Workshop module can be a handy way to move it around. To the users of the application, it won’t look any different from a normal Workshop application.
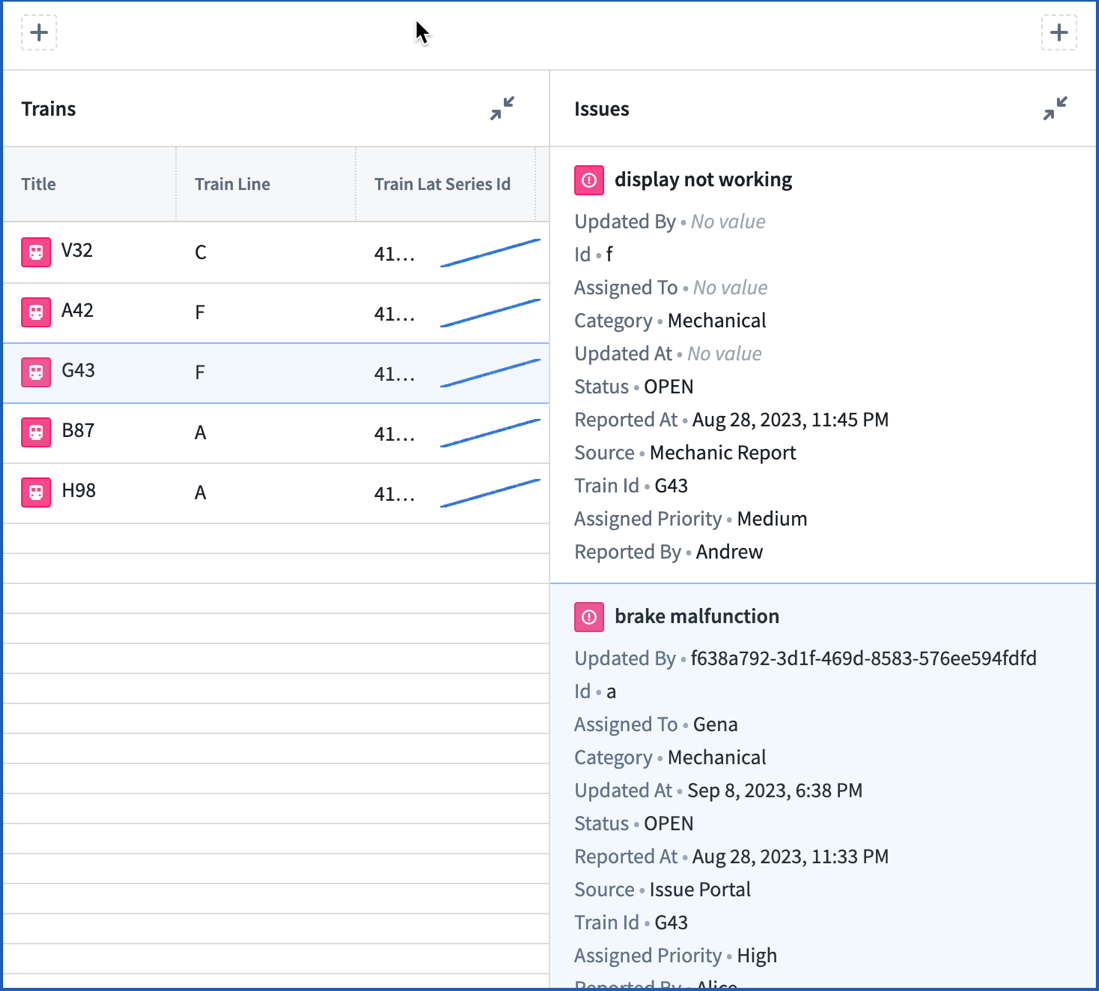
In this case, we’ve built a simple module that we’d like to embed in multiple other modules. We have a table with a list of trains. When we click on one of the trains, we’ll see the issues that are linked to it.
Promoted Variables
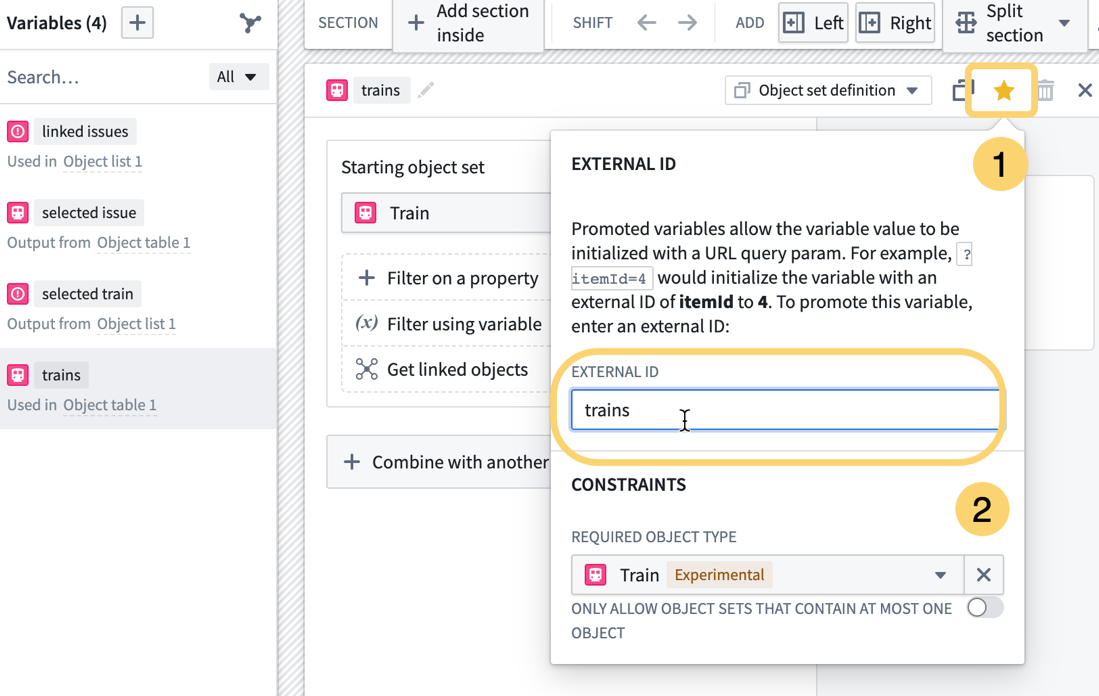
Promoted variables are what make embedding one Workshop application into another Workshop application possible. An embedded Workshop module will consume variables (objects or not) from the Workshop module it is embedded in. For this specific case, you only need to configure promoted variables in the Workshop that will be embedded. Promoted variables tell the Workshop module which variables it can expect to inherit from the Workshop module where it will live. You can promote as many variables as you want, however, it really only makes sense to promote the variables that you want to change based on the surrounding Workshop module. In our example, we have several variables, however, the train issues that we display depend only on the train that the user selects. In the screenshot, you can see that all variables are descendants of the “trains” variable. Therefore, that’s the variable we should promote.

To promote a variable, open the variables in Workshop and navigate to the variable you’d like promote. Click the star in the upper right corner. You can give it any external ID you’d like, but it can’t have the same external ID as any other promoted variable within the module.
Additional Considerations
If the Workshop application to be embedded is not going to be used more than once, then I do not recommend creating a separate application. Because you can’t edit an embedded Workshop from the module that it is embedded in (you’ll need to edit the module itself in a separate tab) it can make iteration slower.
Future Learning
There are many more widgets you can embed in Workshop. Here are a few more:


